
If you’ve got a website and want to generate leads by creating gated content with Gravity Forms, you’ve come to the right place!
As a business owner or marketer, you need to know that the most important thing about promoting and selling your products is paying attention to your buyer’s journey and getting to know your potential clients. It’s not a piece of cake to persuade your website’s visitors to simply give out their personal information, so you’ll have to offer them something in return for fair trade. Giving them access to a valuable piece of content in exchange for some information about them is a good strategy to generate leads that a lot of businesses implement.
We’ll talk in this article about what gated content is, the process to create it, the differences between gated and ungated content, as well as tips for generating leads with this type of content.
Here are some of the most common mistakes we’ve identified among businesses that don’t gate their content to generate leads:
❌ You can’t rely on your intuition – Without developing a strategy and creating a customer base, you won’t know your target audience. In any competitive market, it will be difficult to keep the doors open, no matter how good your products or services are.
❌ Stop search engines from showing your valuable content in their results – If you’ve got helpful content, you shouldn’t make it freely available for everyone. Make sure to use protected content and get something in return that can grow your business.
❌ You may not be able to turn prospects into customers – Without lead generation, most businesses will lack sales because they won’t have the opportunity to convert potential customers into clients.
What is gated content?
DID YOU KNOW that according to studies on the B2B market, 80% of B2B content marketing assets are gated and that the main goal of marketers is to generate leads?
Gated content is any type of content that viewers can gain access to if they give some information in exchange – name, email address, job title, company. Basically, gated content helps you gather leads for your offers and use those leads in your marketing strategy and sales funnel. It is an effective method to prompt visitors to share personal information.
Usually, businesses restrict access to their content with a form. But what type of content can you hide? Here are some gated content examples: white papers, ebooks, webinars, discount codes, or product demo.
Creating a gated content sales funnel isn’t always the best strategy to increase the downloads of your digital product. Let’s list some pros and cons of gated content.
| Advantages of gated content | Disadvantages of gated content |
| Grows lead generation | Less traffic and page views |
| Boosts sales | Less brand visibility |
| Helps you get information about your customers and provides analytics | You can’t benefit from SEO |
| Segment your email list | The form can discourage people from downloading content |
Some people may be reluctant to fill out the form even when they get something in return. So, if people are not still comfortable sharing their personal information, your content won’t be downloaded. If this happens, you’ll better opt for ungated content.
Gated vs. ungated content
There will also be ungated content if there is gated content, right?! When creating content, you should think of one thing – what do I want to do with my content? Well, if your answer is to generate leads, then go with the gated content. However, if you want to increase brand awareness or gain more traffic for your website, ungated content is your solution.
Certain types of content are more likely to be gated or ungated than others. For example, ungated content often consists of blog posts, YouTube videos, infographics, testimonials. It is content that anyone can access without filling any form or sharing personal information. This type of content can help you build trust among your potential customers because you offer valuable information at no price or service.
So, when to use gated content and ungated content? Every buyer has a journey, and you should pay attention at every stage of the marketing funnel to make sure you use gated or ungated content correctly. If you want to use gated content to generate and nurture leads, you need to pay attention to the buyer’s journey.
The three stages of the buyer’s journey
- The awareness stage – In this stage, prospects identify a problem, search for a solution that can solve their problem, find your business but don’t know much about it. Some handy content for this stage could be white papers, infographics, blog posts, ebooks.
- The consideration stage – The prospects start trusting your business and consider it a potential solution to their issue. Webinars, case studies, and software downloads can be helpful for potential customers in this stage.
- The decision stage – Prospects have decided on their solution approach or strategy and whether your brand can or cannot solve their problem. The best offers for this stage can be a discount code, free trials, product demo, and free consultations.
As you can see, both gated and ungated content serve different purposes, and you can use both of them on your website. You can use gated content sparingly, or you can use it a lot. Same with ungated content. It all depends on your strategy. Now let’s see how to develop gated content for lead generation in WordPress.
How to create gated content on a WordPress website
If you have a WordPress website and you’re wondering how to add gated content on a WordPress website, this section is made for you. We’ll show you how to create gated content with a WordPress plugin.
Step 1: Create a new Gravity Form
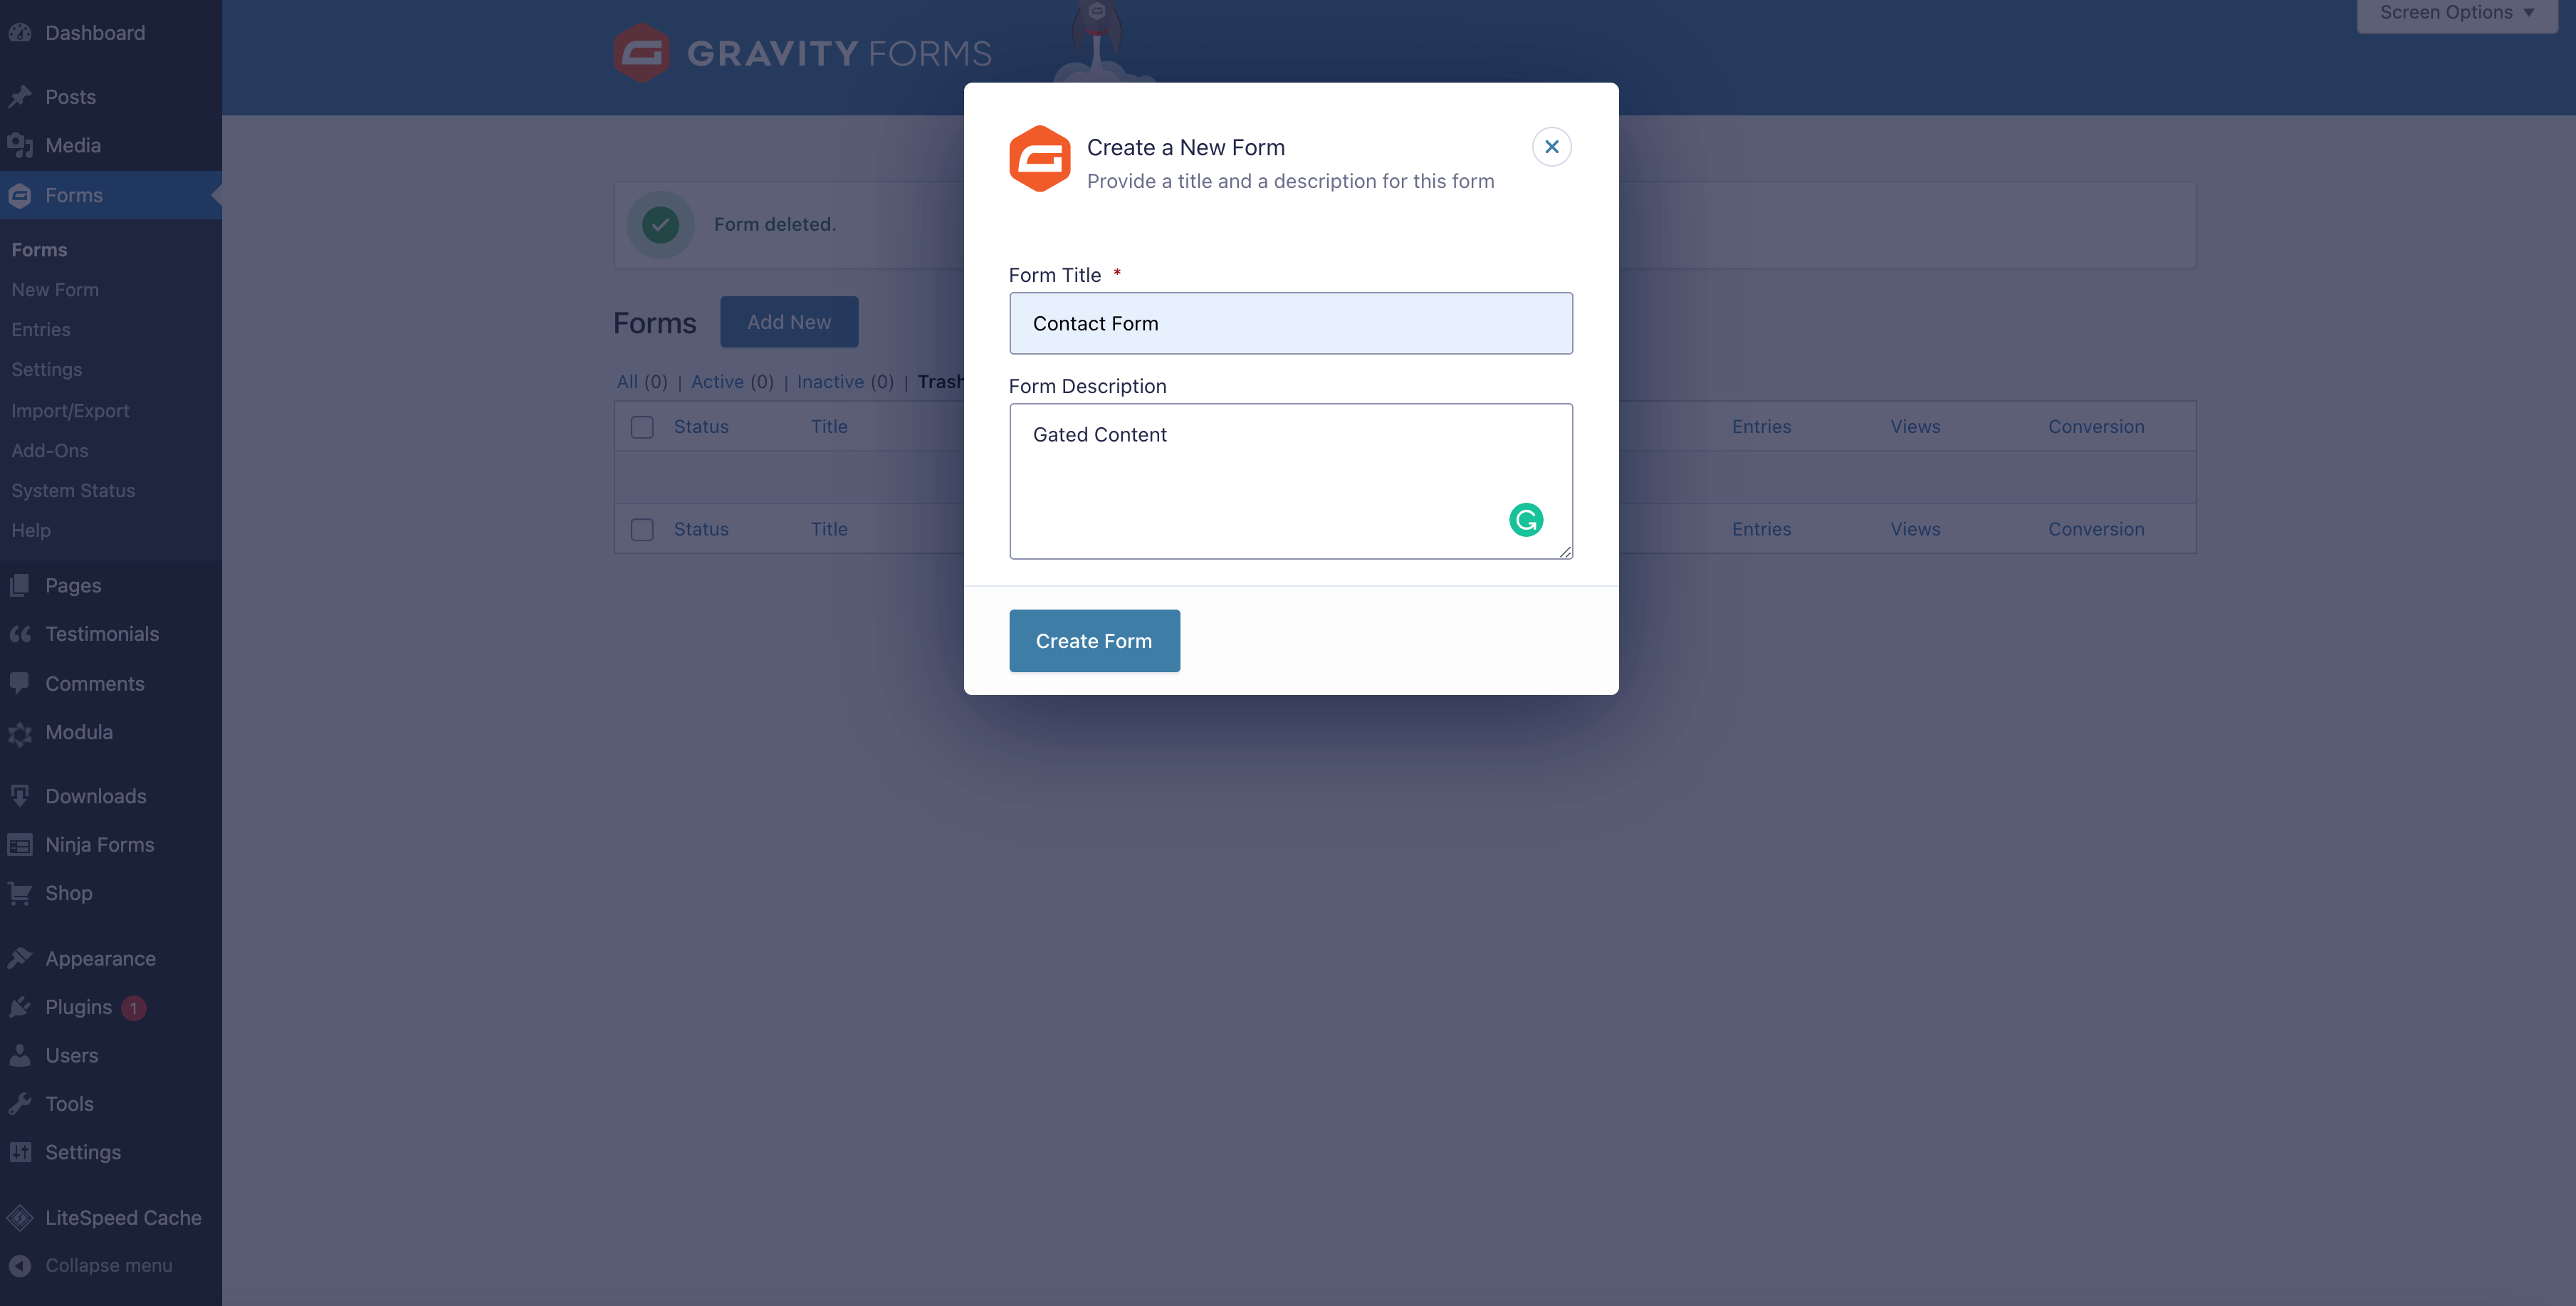
First off, make sure you have the Gravity Forms plugin installed and activated with a valid license. Then, you can start creating your form to restrict access to downloadable content. Go to your WordPress Dashboard > Forms > Add New. Here you’ll be asked to add a title and a description for your form.
Next, you’ll need to add form fields. As you can see in the picture below, I added only two fields – one for the name and one for the email address. You can add more if you want to, even custom fields, but not too many. Adding questions and too many fields can decrease conversion rates.
If your potential customers are in the awareness stage, you can’t ask them for too much information because they will be reluctant to share personal data. However, if they are in the decision stage, you can create a more extensive form. But let’s not forget that anyone hates long forms with a lot of fields. Don’t worry; with Gravity Forms, you can divide it into sections and create a multi-page form.
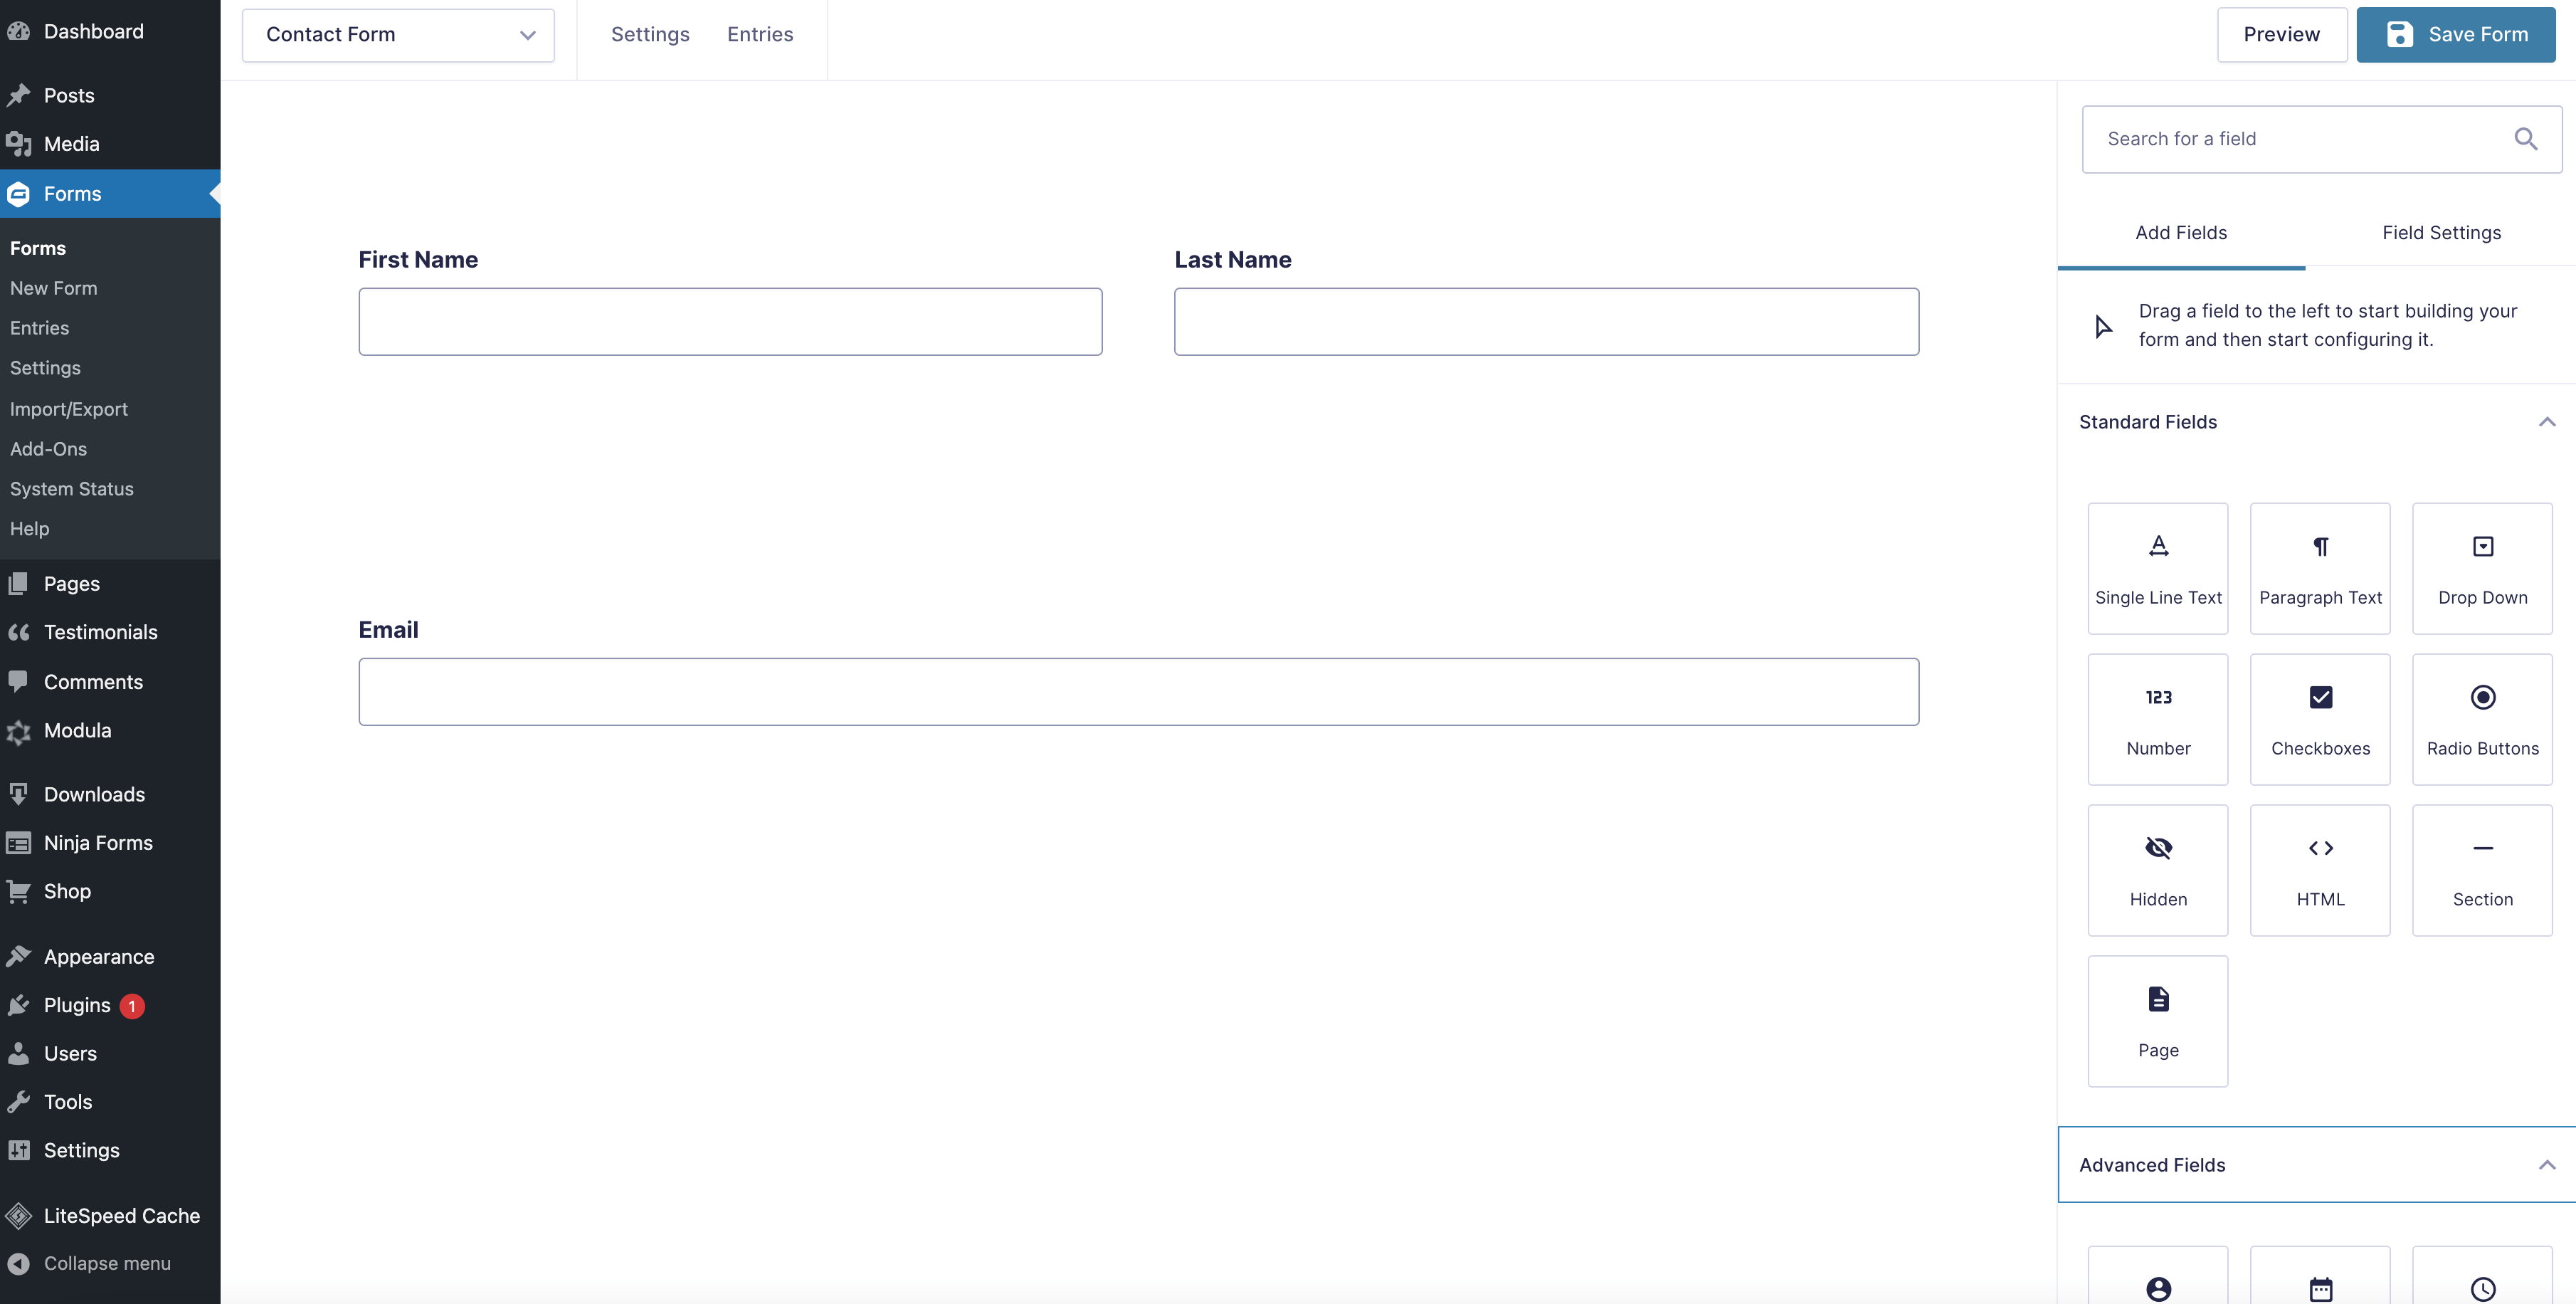
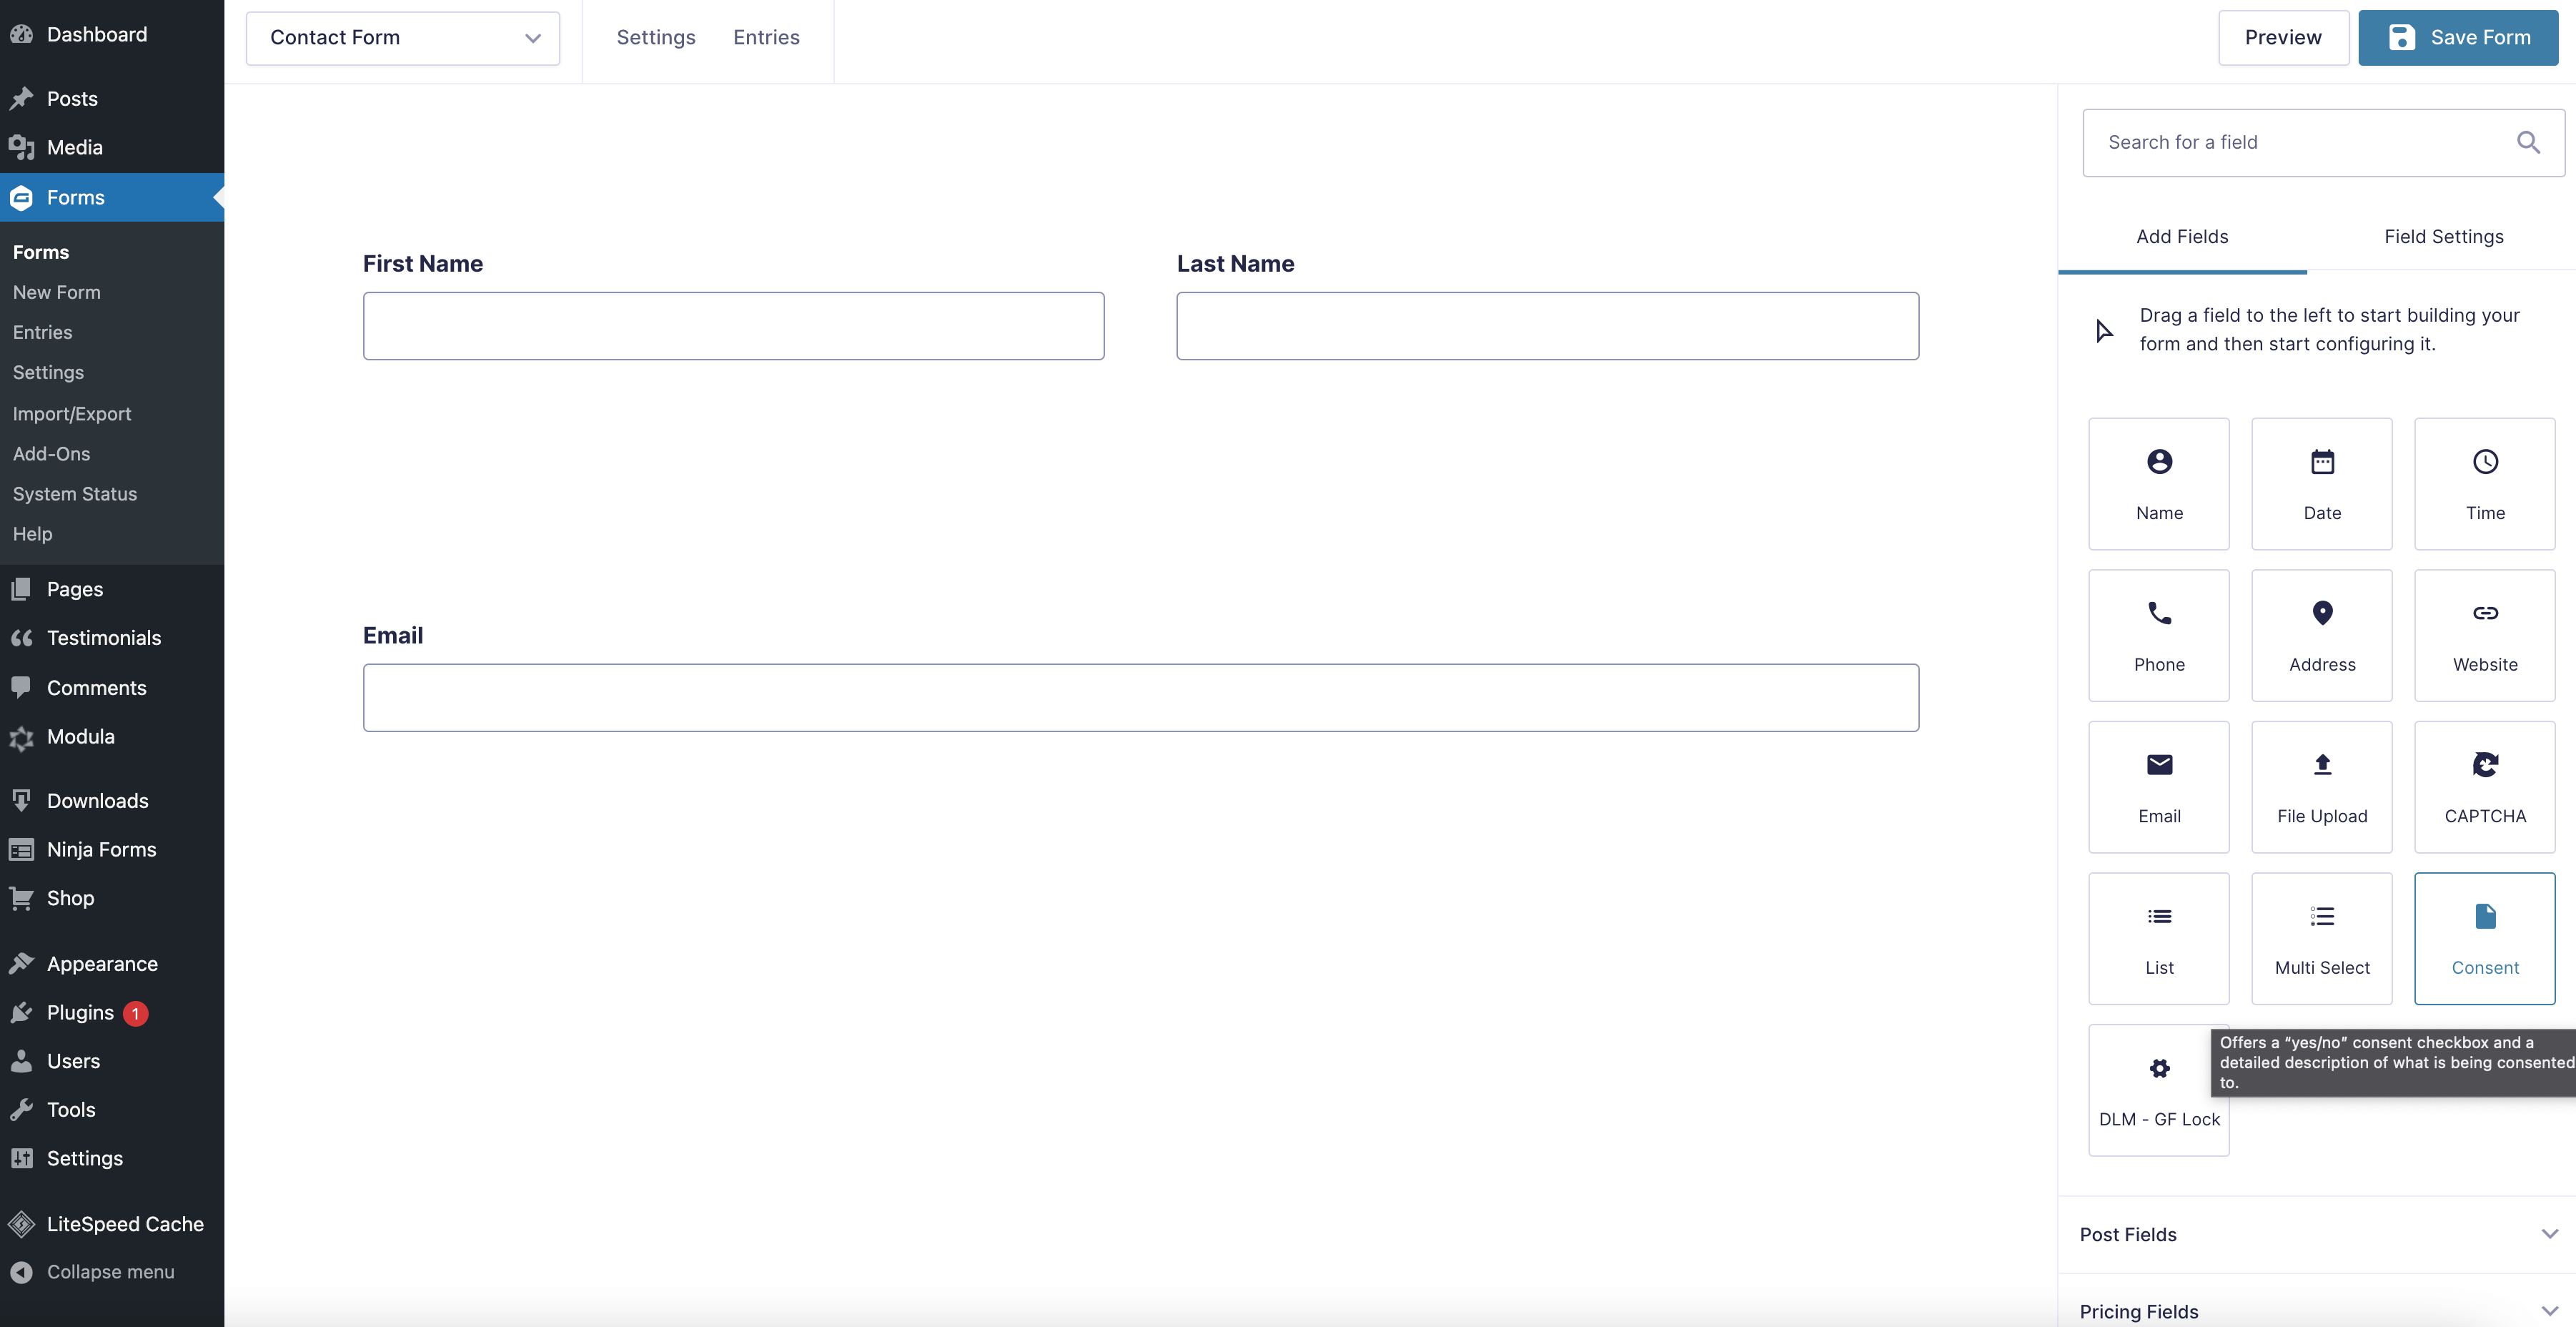
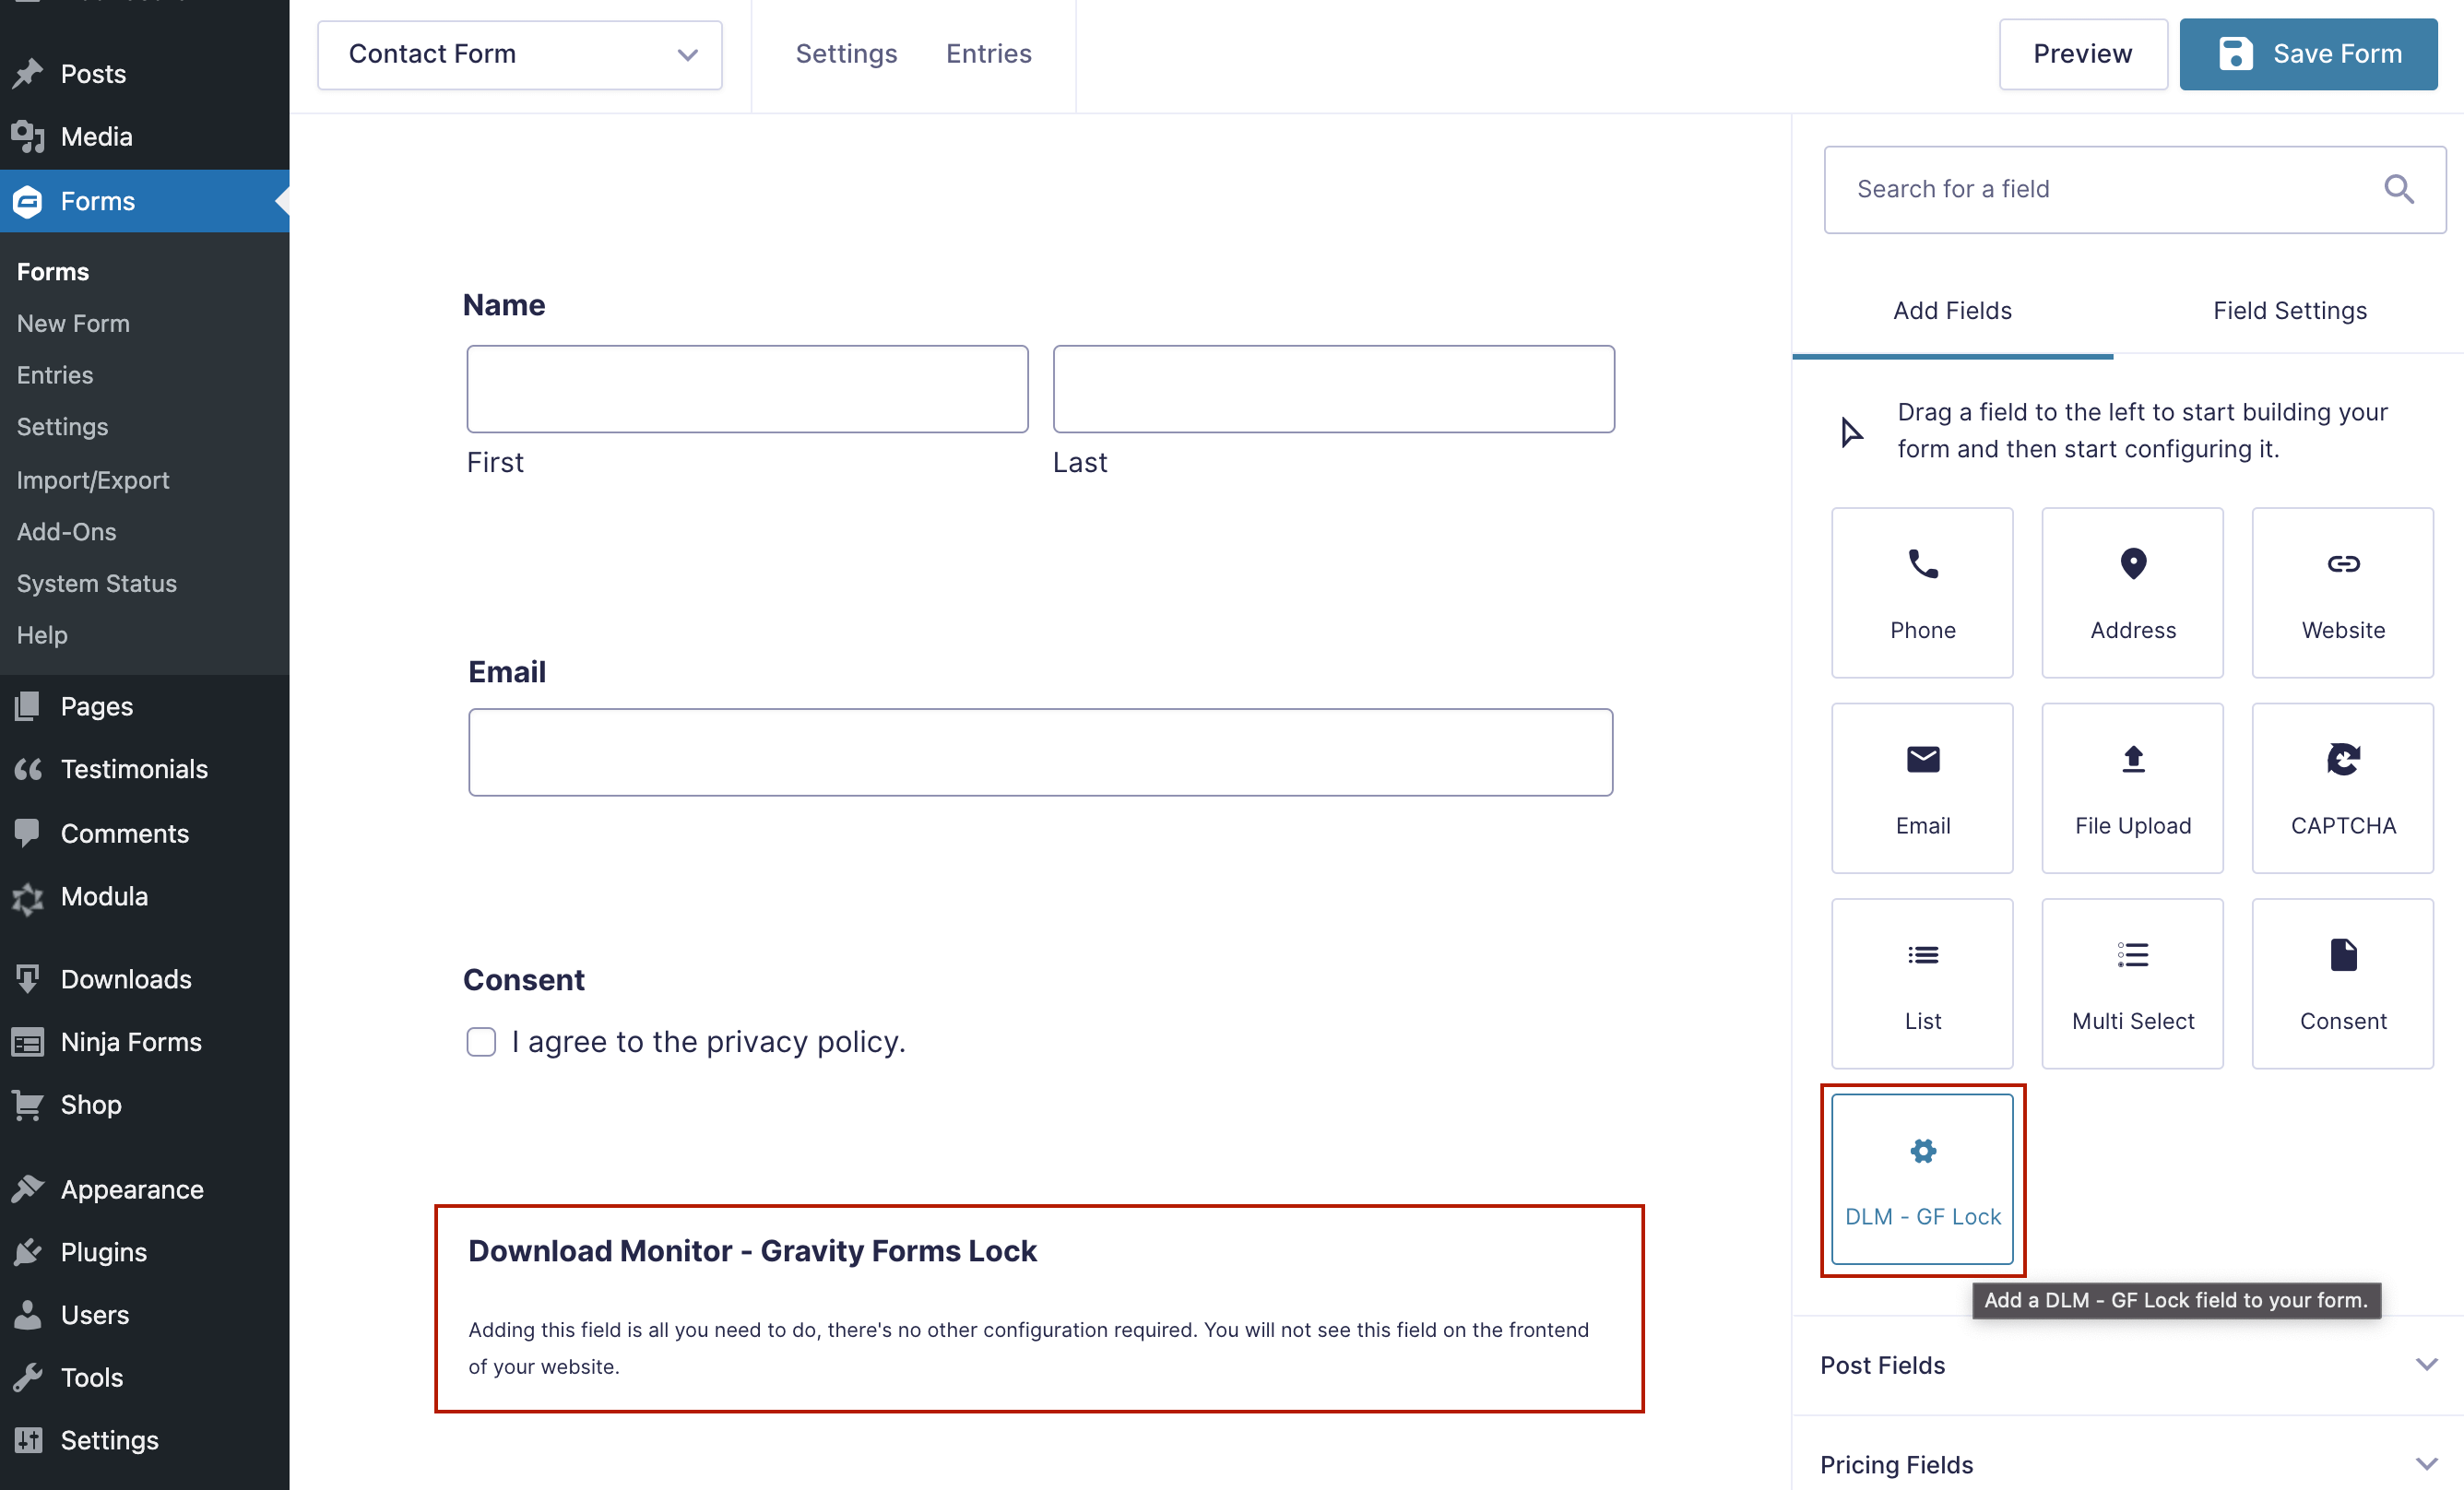
With GDPR being so harsh these days, you will need to ask permission from your users to use their information for marketing purposes. Thanks to Gravity Forms, you can create GDPR gated content by adding the Consent field from the Advanced Fields section.
Skip this step if you have already created a Gravity form to connect to a file.
Connect Download Monitor with Gravity Forms
In order for the Gravity Forms extension to work properly, you need to drag and drop the DLM – GF Lock field to the forms you’ll use to gate downloads. Don’t worry, this will not show up on the front end of the website.
After you’ve finished setting up your form, click Save Form to move on to the next step, where we’ll show you how to use the Download Monitor plugin to build a download gate.
Step 2: Add downloadable content to your website
If you want to know how to add a gated whitepaper to WordPress, or any other type of downloadable file, Download Monitor comes in handy. Once you have Download Monitor installed and activated, go to your WordPress Dashboard > Downloads > Add New. Next, scroll down to Downloadable Files/Versions.
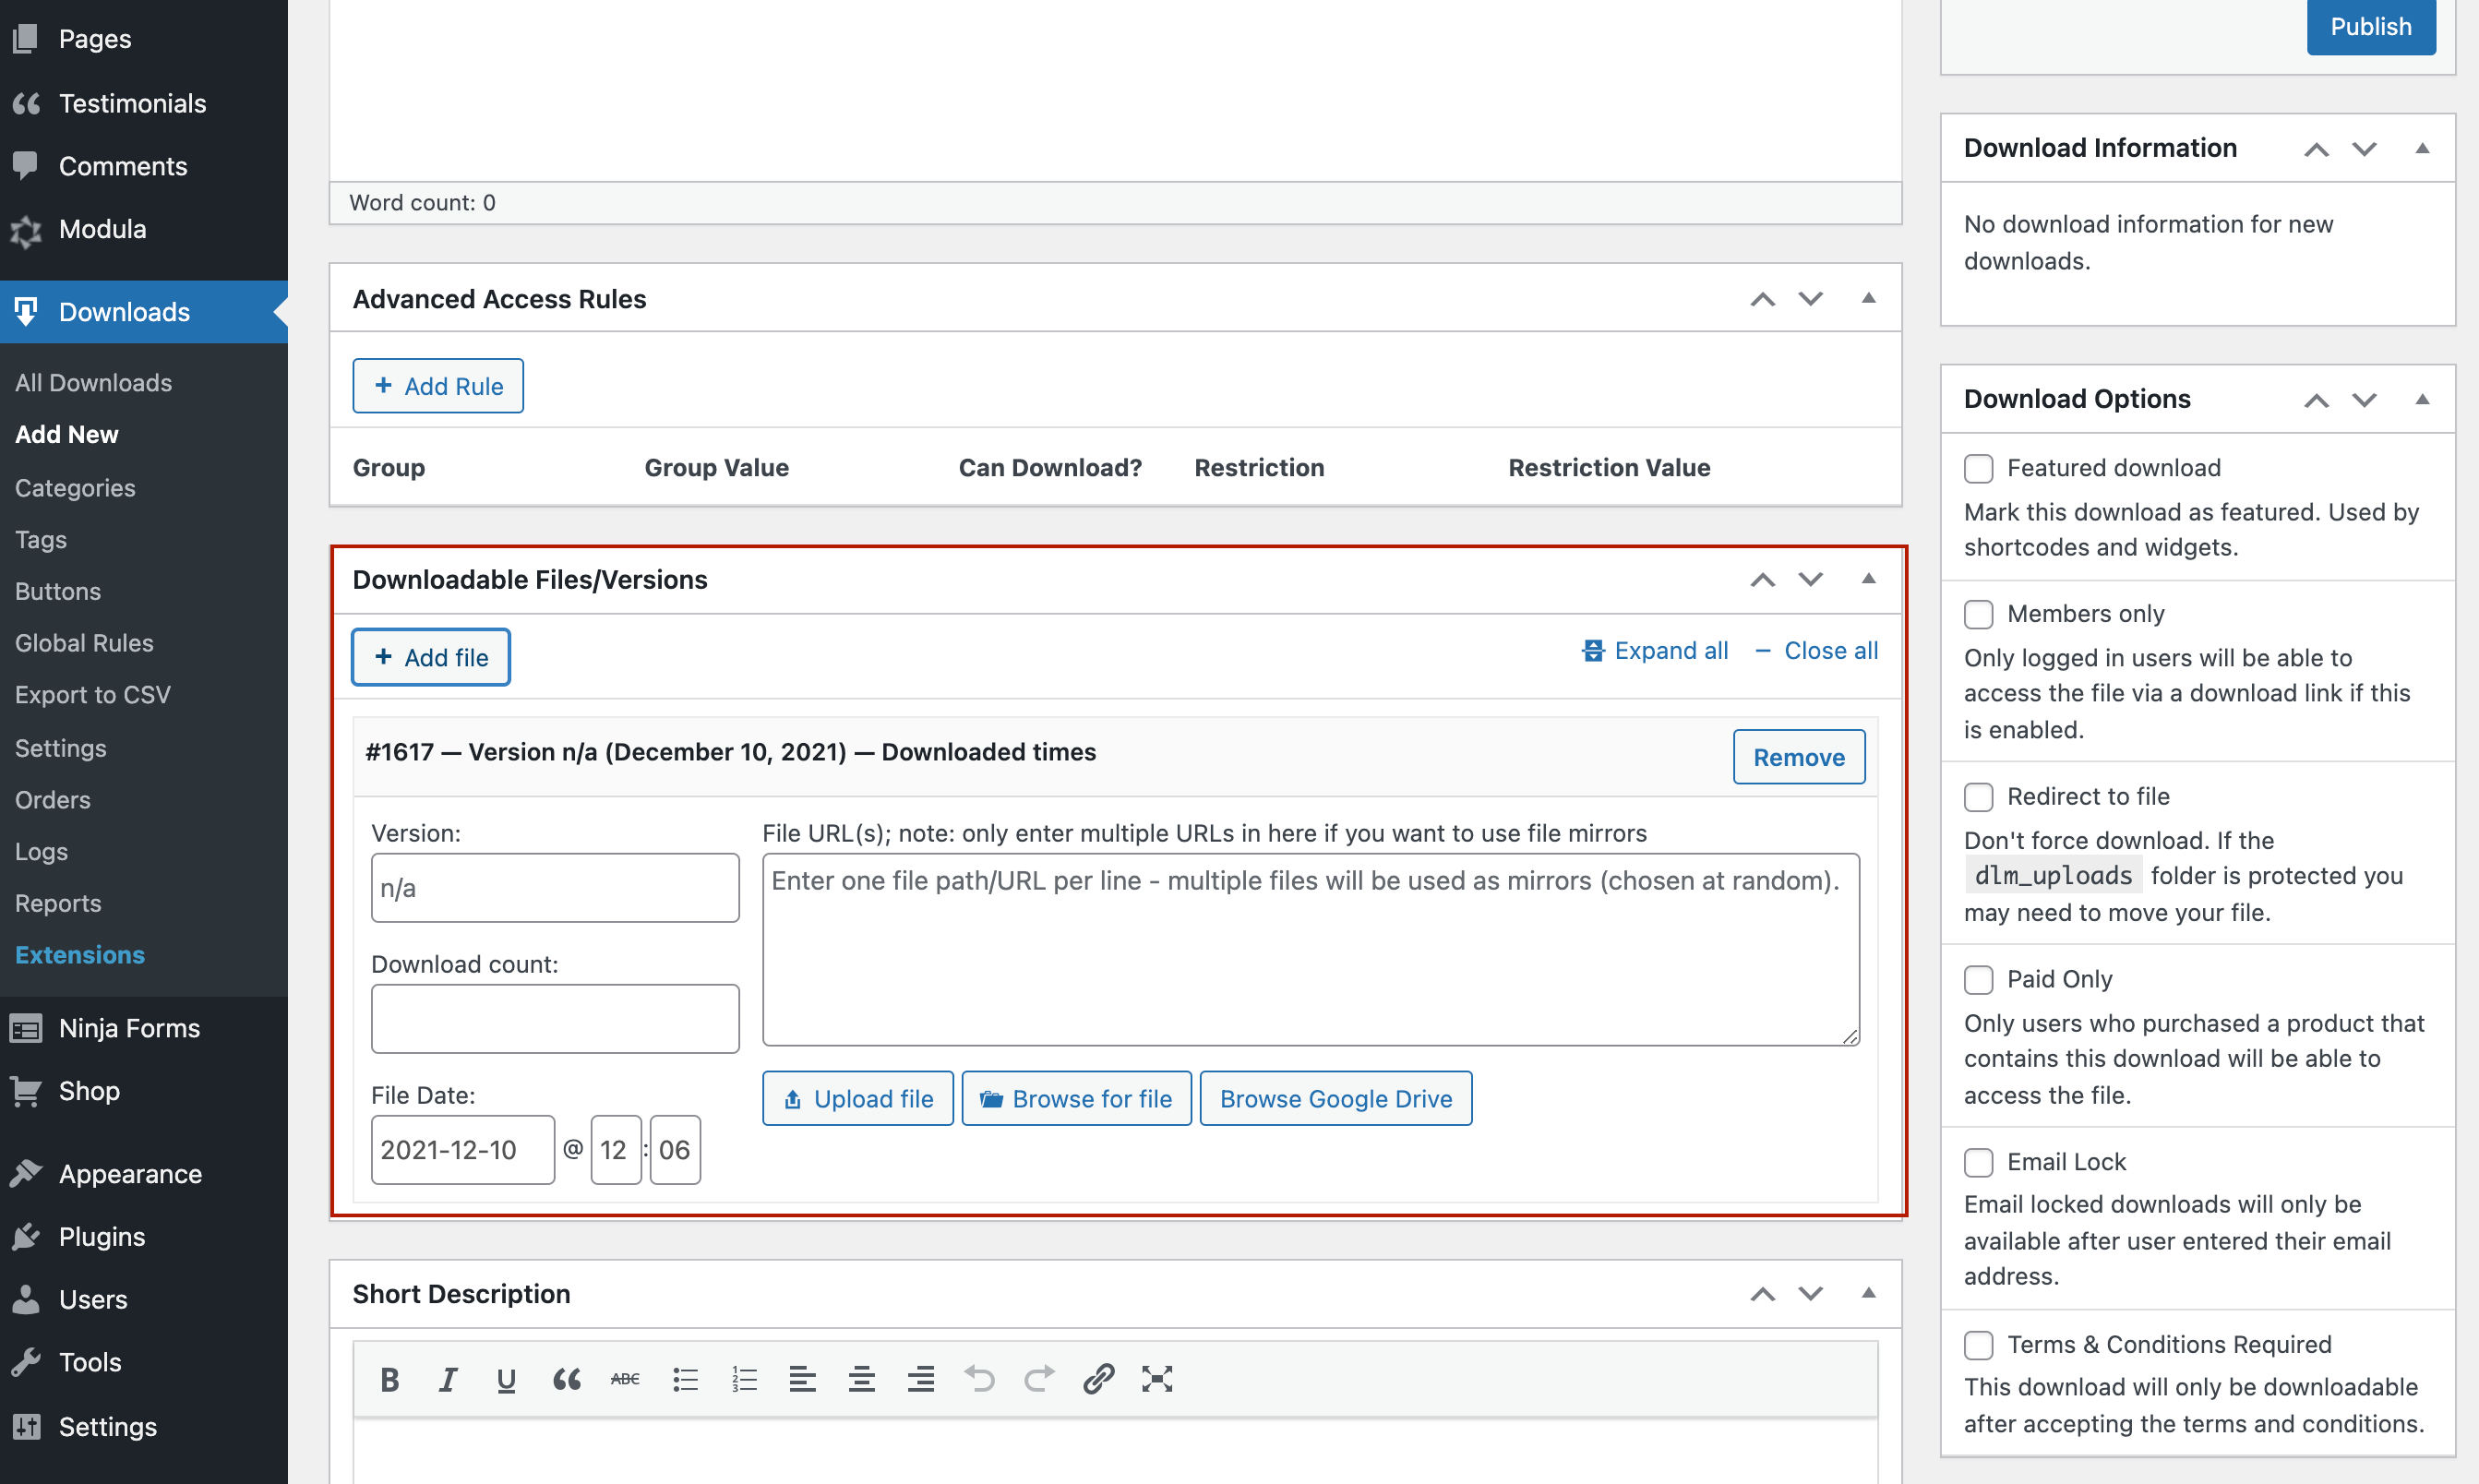
In this section, you can choose to upload your files, add files from Google Drive or Amazon S3 cloud platform. Once you’re done setting up your content, you’ll need to create a connection between Download Monitor and Gravity Forms.
Step 3: Restrict access to your content
To do this, you must first install and activate the Gravity Forms Extension to easily gate your content.
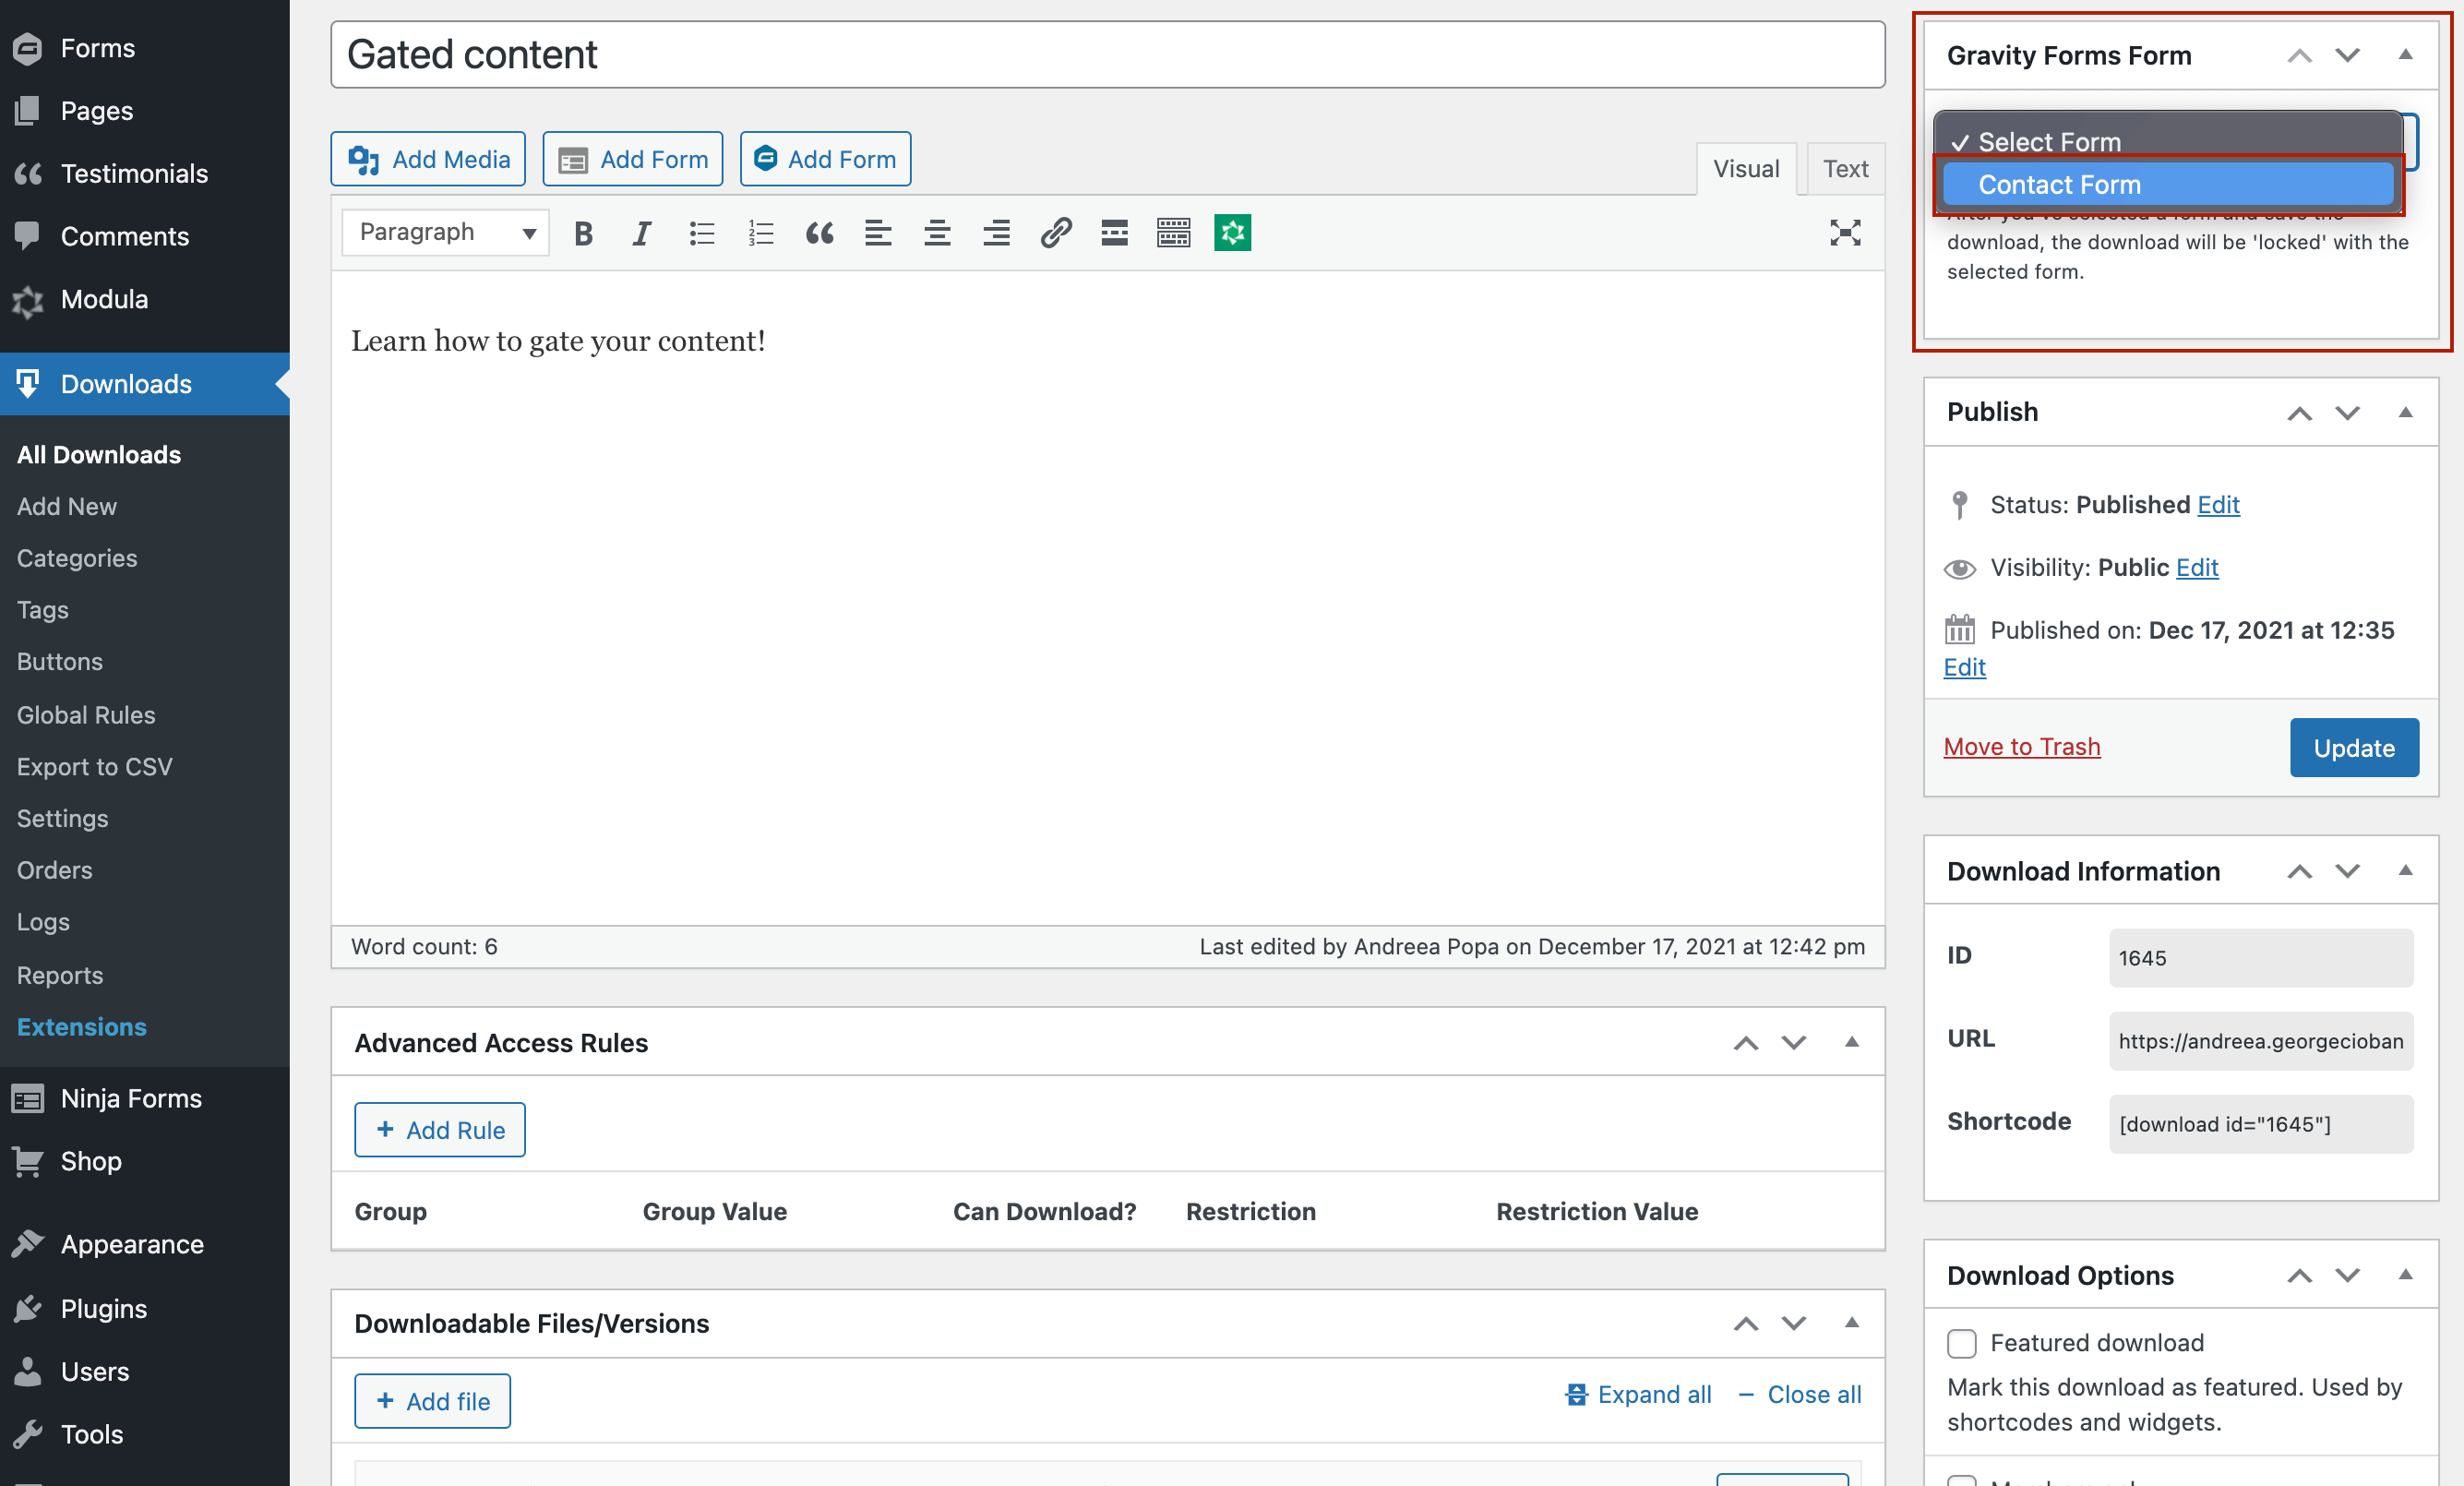
You’ll find a new meta box on the right side called Gravity Forms Form on the same page. Select the form you want users to fill in to get access to download; in my case, I’ll select the contact form. The process is super easy, and it won’t take you more than a minute.
The Gravity Forms extension for Download Monitor lets you ask users to fill in a Gravity Forms form before gaining access to a download. The gated content will only be accessible after the user has successfully completed the form submission.
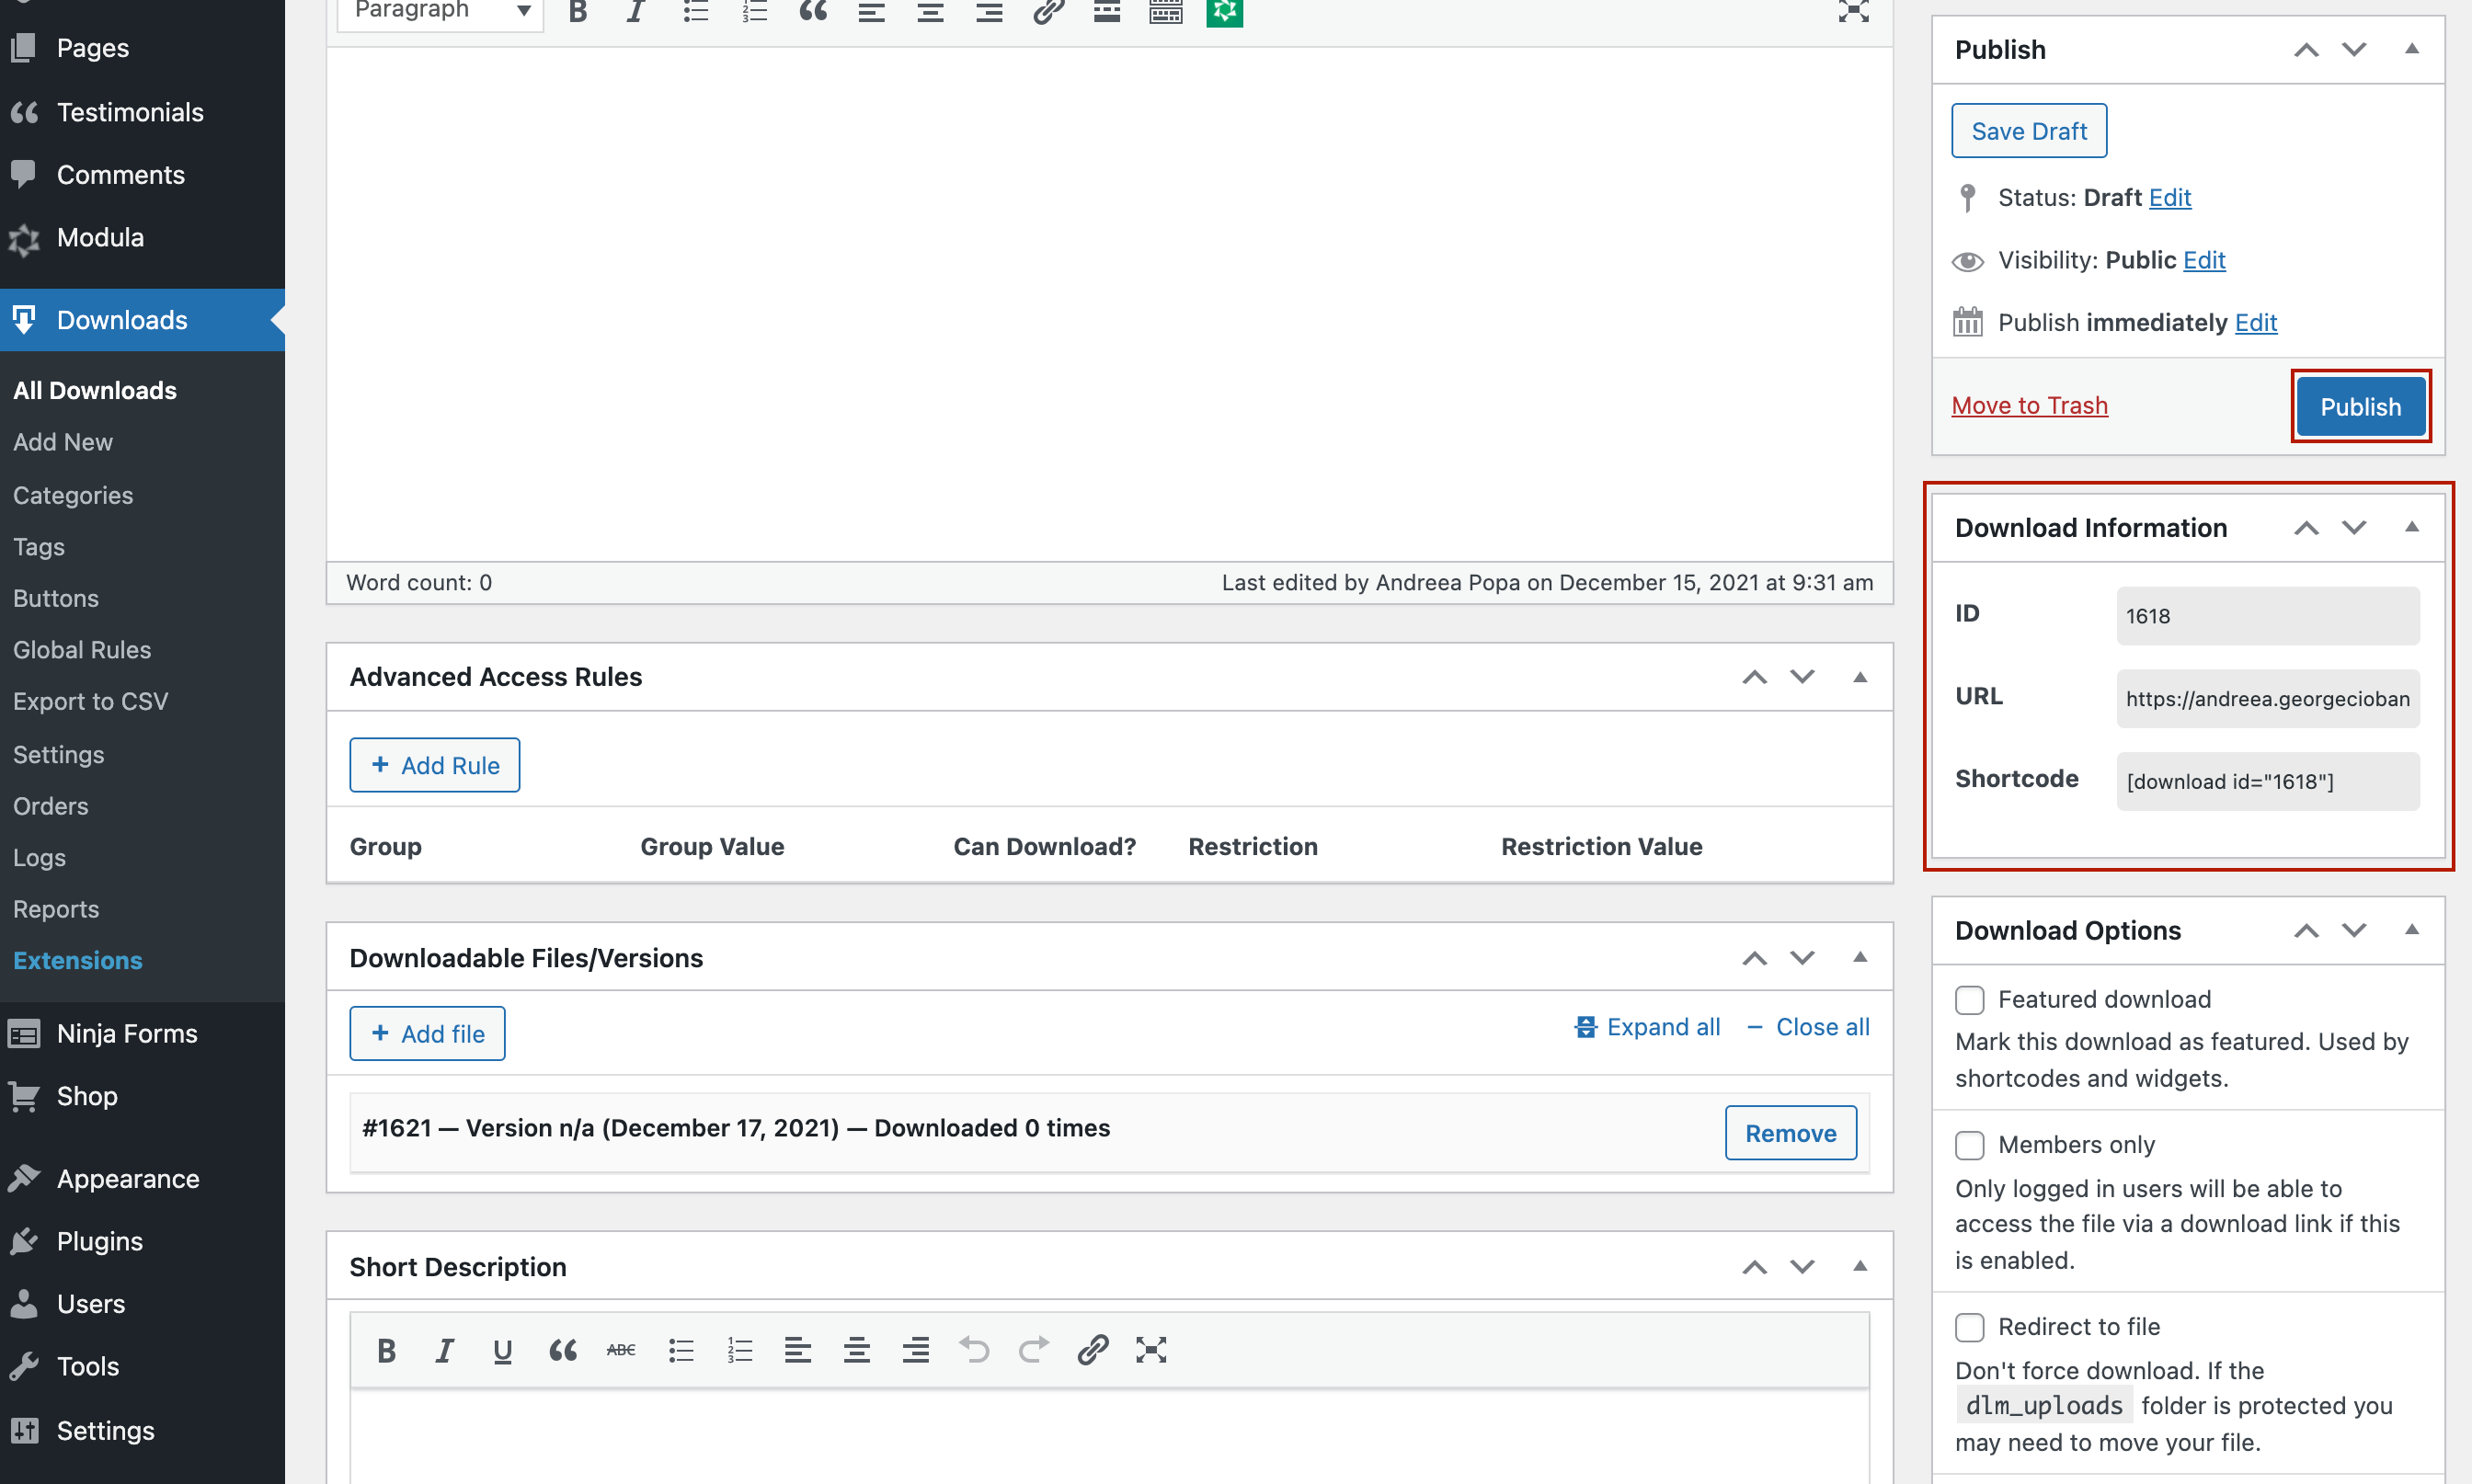
After you publish the download, a new section, called Download Information, will appear on the top right that contains an ID, a URL, and a shortcode for that specific download.
It’s up to you if you want to use the shortcode directly to insert download links with text anchors or use the URL to create an anchor on a button. You can create a download button the normal way, with a Gutenberg block, or you can use Download Monitor’s Buttons extension. This extension for Download Monitor helps you create custom download button templates without any coding. Style your download buttons any way you like – set the background colors and customize the border, select a font, a font color, and even font size.
But that’s not all!
Using Download Monitor with Gravity Forms will not only help you add a form to WordPress for gated downloadable content, but you will also be able to track your downloads and analyze your data.
We also recommend setting up an email alert to get immediately notified when a form was submitted and the content was downloaded. You can activate the Email Notification extension to stay on top of your download activity and get notifications every time someone offers their information.

Download Monitor
Grow your audience, track download performance, and convert your traffic into email subscribers with an easy-to-use digital downloads solution for WordPress.
How to prevent people from finding gated content
Gated content provides more privacy and detailed information about the audience your work reaches, but it also stops a significant portion of the population from accessing and sharing it.
However, gating your content sometimes doesn’t stop search engines from showing it on Google, so you’ll need to keep your material away from those pesky spiders. We’ll give you the most straightforward solution: robots.txt files. Robots.txt files allow you to prevent unwanted content from appearing in search results. You can use this file to limit access to a single page, a directory, or even a single picture or file.
FOLLOW this guide on creating a robots.txt file and adding it to your website.
And if you’re asking how you prevent people from sharing gated content, it is simple. People won’t link to a gated landing page for just one main reason: their audience may not agree to give their personal information to another business. Businesses will skip sharing gated content since people are reluctant to provide personal information. So, they’ll choose to share ungated content.
What to do with leads from gated content
Now that we’ve seen how to create gated content with Gravity Forms and Download Monitor, you may ask yourself what’s next. Well, you can do a lot with this type of content:
- Use a post-click landing page with CTAs – most of the time, when people click on a CTA for a content offer, they’ll be redirected to a landing page. Make sure you create a strong landing page with a catchy headline, compelling text, a short form, and CTA buttons.
- Segment your email list – Once you receive the email addresses from your viewers, you can segment your audience and initiate email marketing campaigns. This action will also help you send nurturing emails to transform those leads into prospects.
- Analyze your data – With gated content, you can track conversions and measure the analytics to know your audience better and enhance your content marketing approach. Download Monitor provides excellent reporting for your content: total downloads, most popular downloads, and daily average downloads.
Conclusion
Once you’ve decided which strategy to implement, you’ll know whether or not to gate your content. Of course, the ideal scenario is to increase the number of views/downloads for your content while generating leads. But you’ll get there in time.
Let’s recap the main points:
- Use gated content to generate leads and ungated content to increase brand visibility;
- Pay attention to the buyer’s journey and the three stages to using your content correctly;
- Use Gravity Forms and Download Monitor to grant access to a download only after the user fills a form of your choice;
- Set up an email alert to receive notifications when people fill out the form and download your content;
- Prevent people from finding gated content by using robots.txt files;
- Add CTAs in your post-click landing pages;
- Capture information about your potential customers and segment your audience;
- Track your downloads and analyze your data.