Please note: The functionality described on this page requires Download Monitor version 4.3 or above.
The PayPal payment gateway, included in the Download Monitor core plugin, allows you to accept payments via PayPal. If you don’t have a PayPal account yet, please create one now. You can do so by clicking this link.
Your PayPal Gateway Settings
In order to accept PayPal payments on your website, you will need to configure some things in your WordPress dashboard.
If you go to your Download Monitor settings and click on the Payment Methods tab, there will be links at the top of your screen to configure your payment methods. Click on PayPal.
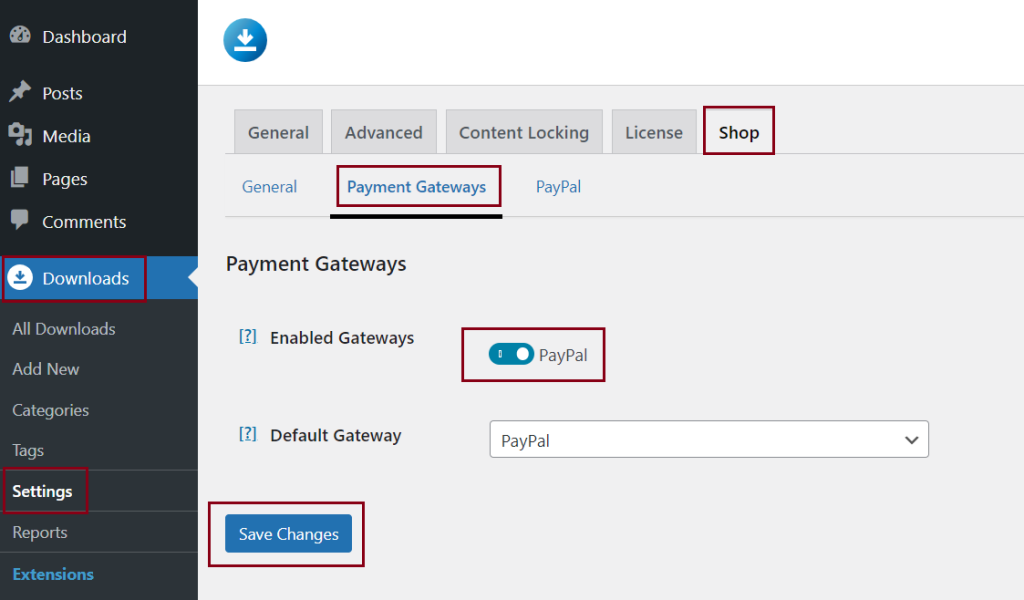
Above is a screenshot of what your PayPal settings screen looks like.
- Enable Gateway
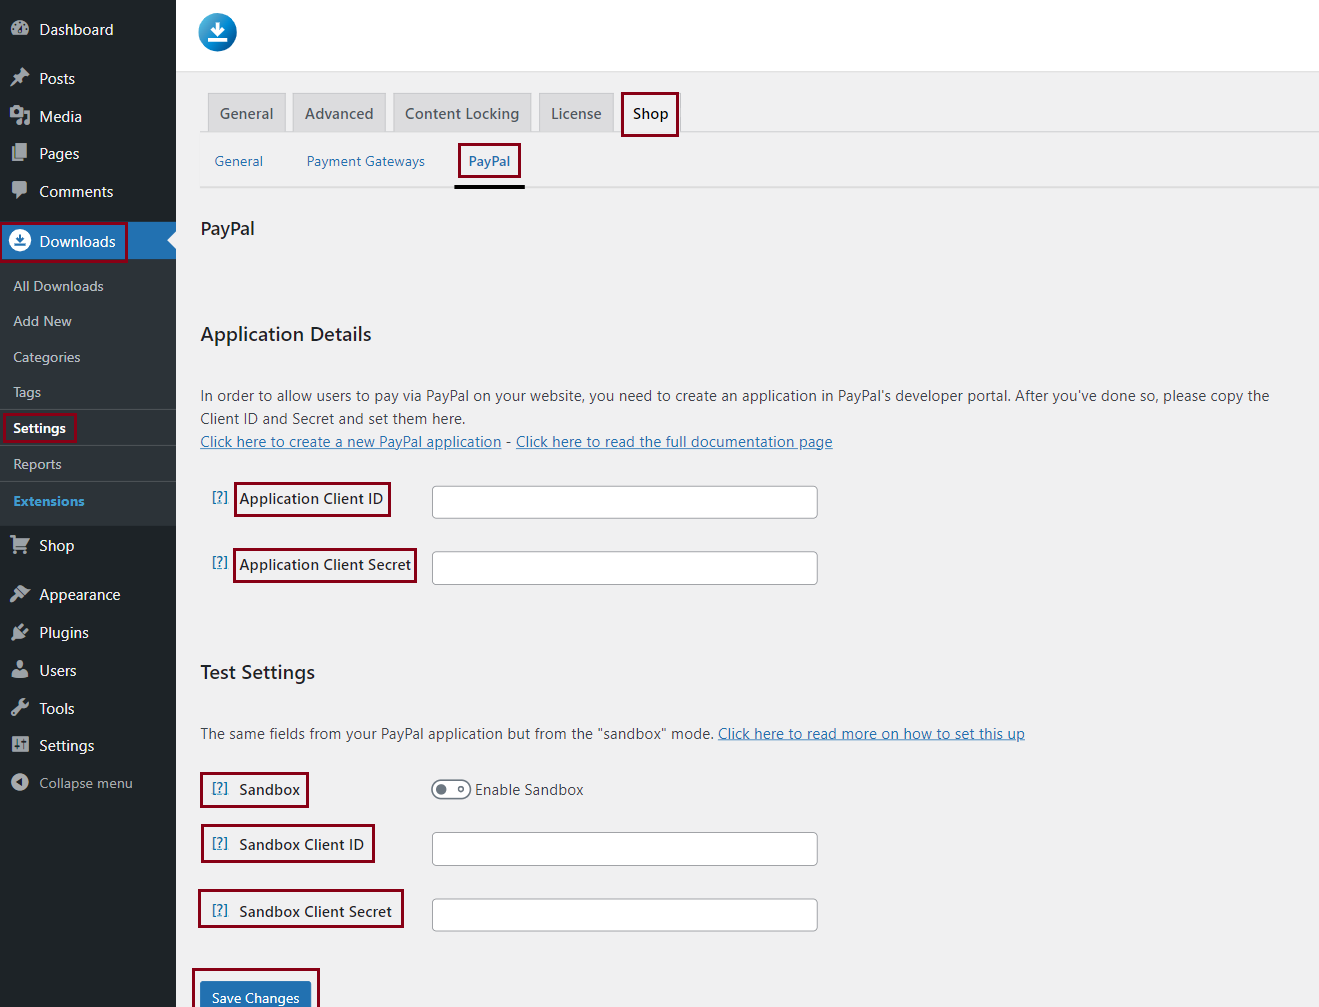
Check this field to allow your customers to select this gateway on your checkout page. - Application Client ID
This is your PayPal application client ID, required to accept PayPal payments on your website. This is explained in more detail in the Setting up your PayPal application chapter. - Application Client Secret
This is your PayPal application secret, required to accept PayPal payments on your website. This is a value you should never share with anyone. - Enable Sandbox
Check this field to enable sandbox mode. While this is enabled, you can test PayPal payments with testing accounts. You can read more about this in the Sandbox Accounts chapter. Make sure this mode is NOT enabled on your live website. - Sandbox Client ID
This is the sandbox version of your Application Client ID (3) - Sandbox Client Secret
This is the sandbox version of your Application Client Secret (4)
Setting up your PayPal application
The PayPal payment integration in Download Monitor requires you to create an application on PayPal’s website. We’ve decided to set up the integration this way because using an application provides a stable and reliable integration and connection with the PayPal servers. This chapter will explain how to create an application and how to set up your Download Monitor website to use this newly created application. If you do not have
Start by clicking here, to go to PayPal’s website.
Log in if need
If you are not logged in yet, PayPal will display the following screen. Click the Log into Dashboard button on the top right of the screen and log in using your PayPal credentials.

Create your new application
If you used the link in this article (or from within our plugin), you should directly land on the Create New App screen. In this page you create your PayPal application. Start by giving your application a name (1). This can be anything you like but we recommend using something that includes your website name, so you can easily recognize it later. This name will not be shown to your customers.
Next, you can select a Sandbox developer account (2) but this should already be set for you. Unless you have a specific reason to change this, leave this unchanged.
Now click the Create App (3) button and your application will be created!

Copy your Client ID and Secret
After your application is created, you are sent to a screen that displays the details of your application. An important toggle button to notice from the start is the Sandbox/Live toggle element (1). The text that has a blue background, is the currently active state. In the first screenshot below, the Sandbox option is active, in the second screen the Live option is active. This is important because whichever option is active determines what Client ID and Secret are displayed.
Because you start with the Sandbox option active, we will set this up in our plugin first. Copy the code that’s displayed under the Client ID label (2). Paste this code in your Download Monitor settings in the Sandbox Client ID (this is option (6) in the settings screenshot). After that, click on the Show link under the Secret label and copy the code that is displayed. Paste this in the Sandbox Client Secret field in your Download Monitor settings (this is option (7) in the settings screenshot).

The sets for setting up your live account are very similar to setting up your sandbox account. Before we proceed, please make sure the Live option (1) is active (has a blue background).
Now copy the Client ID and Secret the same way you did for the sandbox account. Only this time we paste the Client ID into the Application Client ID field (this is option (3) in the settings screenshot) and the Secret into the Application Client Secret field (this is option (4) in the settings screenshot).

Don’t forget to save your Download Monitor settings page. After this you are done, your PayPal integration is now set up and ready to be used!
Sandbox Accounts
If you want to use the PayPal sandbox mode to test your PayPal integration, you will need to create a PayPal testing account. This will be the account your “customer” will use to pay for the order.
Click here to create a new sandbox account
The Country (1) will most likely be set correctly, so only change this if you have a specific reason to do so. It is important to make sure the Account Type (2) is set to Personal (should be so by default).
The Email Addess (3) can be any email address you like. We recommend something easy to remember, as you will have to enter this in the PayPal login screen quite often. The same goes for the Password (4) field. Please note that this should be a new password and NOT the password of your real PayPal account.
You can optionally enter a First Name (5) and a Last Name (6).

After that, scroll down a little bit enter a high balance in the PayPal Balance field (something like 9999), and click the Create Account button. After this, your Sandbox account will be created and should have the status processing. Within a couple of minutes, it should change status to complete. When this happens, you can use your newly created account to test your PayPal integration (while in the sandbox).