Are you looking for a way to limit the number of downloads on your WordPress website based on membership levels? Increase revenue? How about saving on resources?
We hear you; that’s why we’ve put together this easy-to-follow tutorial that will show you how to use Restrict Content Pro and Download Monitor in unison.
We’ll show you the steps needed to create a membership site where users must have a specific membership level to access the number of downloads you have allocated.
Table of contents
Why use Restrict Content Pro and Download Monitor?
Restrict Content Pro allows you to create membership levels, restrict content, and manage members. Download Monitor provides a way to organize and track file downloads easily.
This combination of plugins is ideal for websites that offer premium content or downloads, such as software, e-books, or music. Using both together will allow you to control access to your downloads and track them.
Why Would You Want to Limit Downloads Based on Membership Levels?
If you’ve never considered this business model before, here are a few benefits as to why you should:
- Increases revenue: It helps drive your AOV (average order value) by pushing your customers up the pricing tier when they want to download more files than their current plan allows.
- Save on costs: It prevents abusive use of your website’s resources/bandwidth by limiting the number of downloads a paying user can make.
- Prevents misuse: It’ll discourage account sharing, as no one would want to have their download quota exhausted, which means new user accounts and more paying customers!
- Increases revenue: If you’ve set the option for a paying user’s download quota to expire at the end of their period, it’s an excellent way to encourage the customer to keep their subscription active and renew every month.
As you can see, there are significant benefits to limiting downloads based on membership level from a sales viewpoint and resources.
So if you’re currently running a membership-based revenue model or thinking of setting one up, this guide will show you how you can increase revenue with Restrict Content Pro and Download Monitor.
Our end goal
The use case we’re exploring today is one where you’d want to allocate a specific number of downloads per each membership level registered in Restrict Content PRO.
We have two criteria:
- You’d like your customers to be able to download your files a fixed number of times in a given period.
- You would like to reset the download quota at the end of a pre-defined date. For example (end of the current month, on the 15th of next month, etc.).
In the next section, we will cover a specific example we will use throughout the rest of the tutorial.
Packages for our website
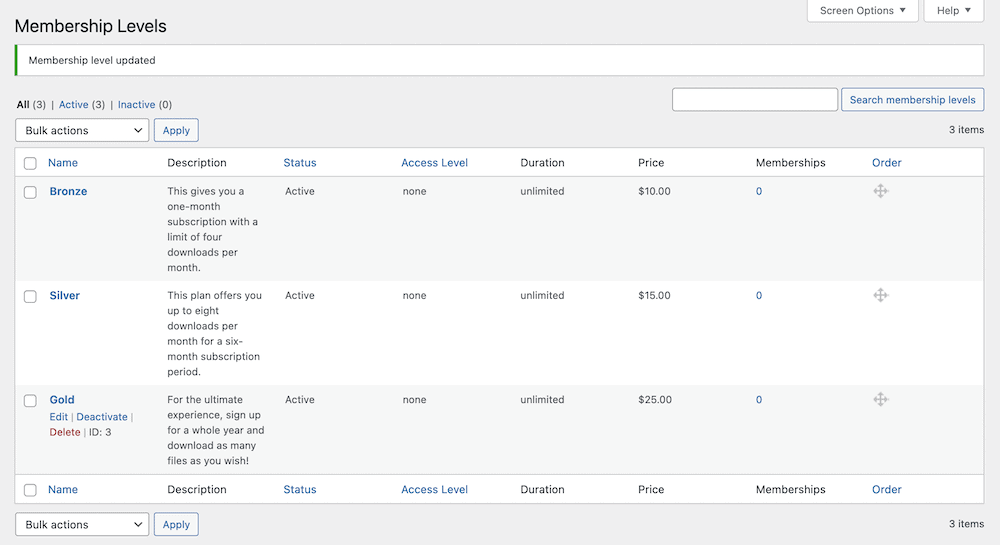
We will offer downloadable files – namely, templates. There will be three membership levels: Bronze, Silver, and Gold.
Each tier has its limitations:
- Bronze: This is a rolling, one-month subscription allowing you to download four (4) times per month.
- Silver: You can download files up to eight (8) times per month for a six-month subscription, adding up to 48 downloads for the entirety of the subscription’s duration.
- Gold. Users have no download restrictions on this plan, but it’s a year-long membership with a higher price than previous tiers.
Remember that you can adjust this specific example to fit your needs.
You can add more subscription levels, change the periods, change the file download allocation, and decide if you’d like the downloads to carry over month-over-month or just reset themselves at the end of the billing cycle.
The Tools Required to Limit Downloads Based on Membership Levels
You will need four tools to create a limited download system based on membership levels. However, only two are essential to carry the heavy work:
- Download Monitor: The plugin allows you to upload, manage and track files on your WordPress site. It’s the best choice on the market for this job – currently rated 4.5/5 on the official WordPress.org repository.
- Restrict Content Pro: This enables you to create access rules for a membership website and add different subscription levels.

Download Monitor
Grow your audience, track download performance, and convert your traffic into email subscribers with an easy-to-use digital downloads solution for WordPress.
In addition, you will also need to install a couple of extension plugins for additional functionality:
Download Monitor’s Restrict Content Pro integration plugin: This plugin ensures compatibility and integration with Restrict Content Pro to restrict access to specific downloads.
Advanced Access Manager. This Download Monitor extension provides advanced controls to restrict content on your site.
ℹ️ If you want to read more about Advanced Access Manager or buy it, follow this link.
You will need to install and activate each of these plugins on your site. Installing them is straightforward, similar to any other WordPress plugin.
How to Limit Downloads Based on Membership Levels
Before we begin, we need to add some files for our users to access. Download Monitor to the rescue!
1. Add Your Files Using Download Monitor
To add files to your site using Download Monitor, go to the WordPress dashboard and navigate to Downloads > Add New.
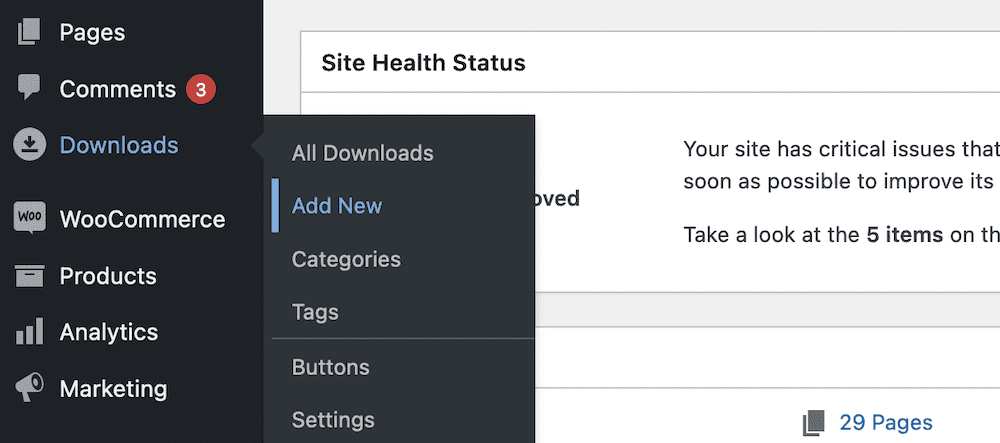
Here you’ll see the screen to add your download.
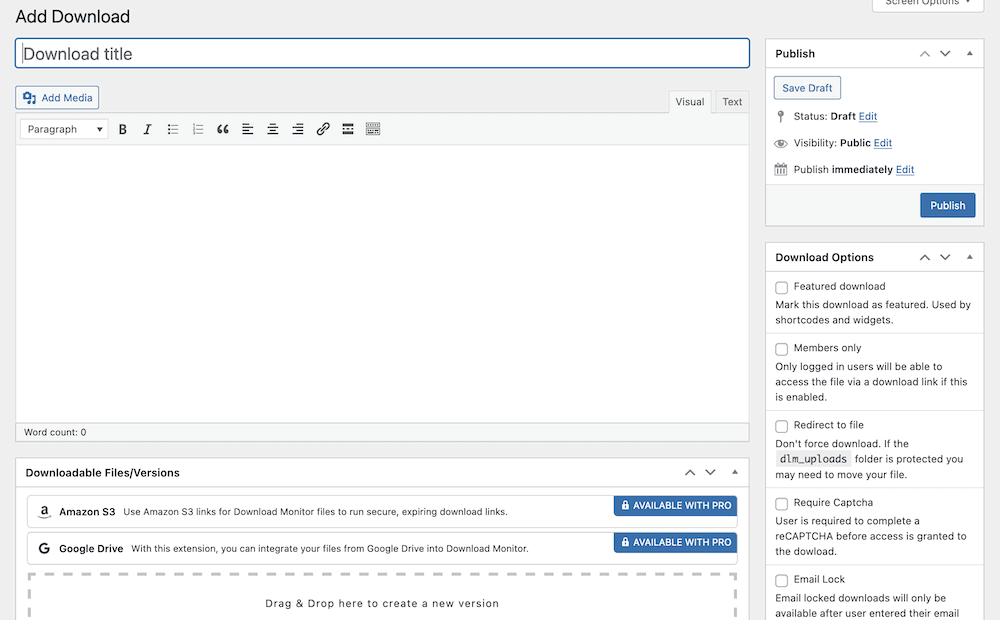
When creating a new download, it’s best practice to provide a title and description; this helps you and, of course, your users.
You will also need to add a file from the Downloadable Files / Versions metabox at the bottom of the screen.
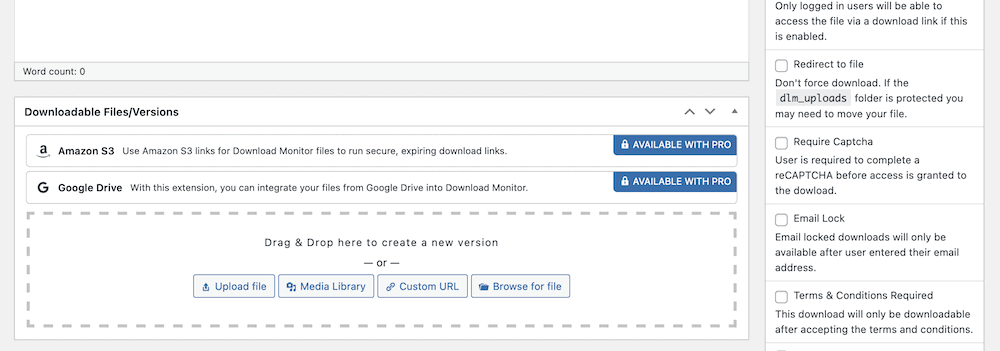
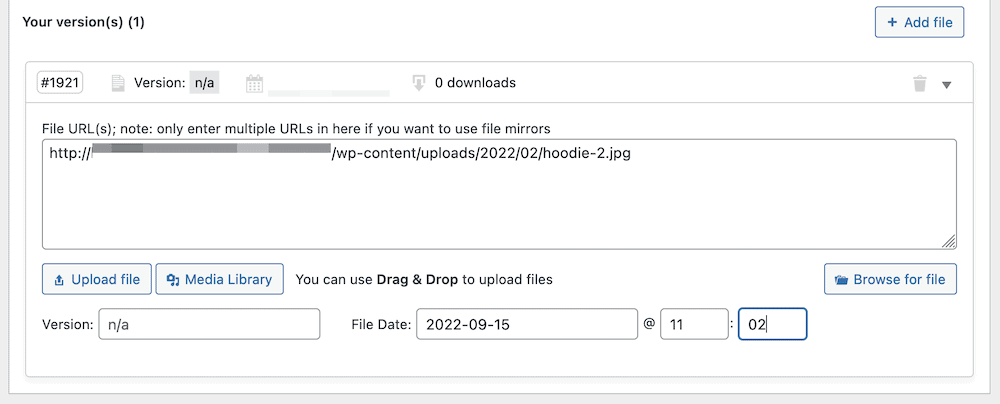
You have several options for where to get the file from your computer, the Media Library, your server, or a custom URL. Once you’ve chosen your file, you can add the upload date and version number.
Once you have completed adding your files, click the blue ‘Publish‘ button to save your changes. You can then move on to adding more files or start using Restrict Content Pro.
2. Create Your Membership Tiers using Restrict Content Pro
First, you need to create custom levels using the Restrict Content Pro plugin to limit the number of downloads based on a membership level.
After installing and activating the plugin, navigate to Restrict> Membership Levels to create these levels.
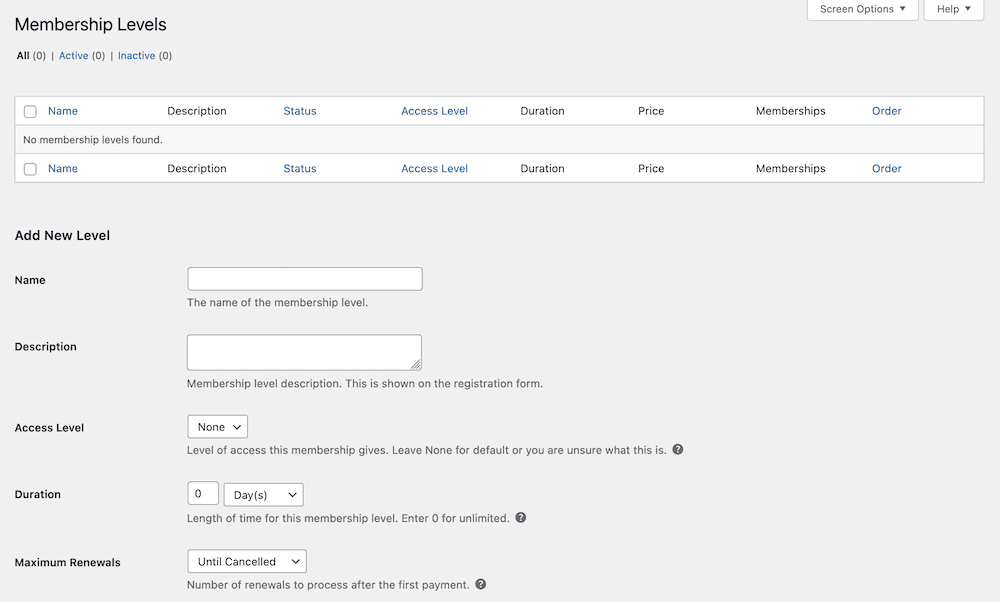
The fields to create the membership levels are easy to fill out. If you need help, you can refer to the Restrict Content Pro documentation.
You can return to the Access Level setting later and adjust if needed, but leave it at ‘None.’ for now.
Once you’ve filled in these fields, you will have created your subscription tiers, and they will be visible within Restrict Content Pro.
After completing your subscription tiers, you’ll need to display them on your website. We’ll explain how to do this by using pricing tables.
3. Set Up a Pricing Table and Add Your Registration Links
Your pricing table is essential; you need to attract and dazzle potential new customers. Explain the upsells and the benefits of doing so.
There are many ways to create a pricing table, but using the Block Editor in WordPress is the easiest way.
To create a pricing table, search for “pricing” in the Block Editor, and you can add one with just one click!
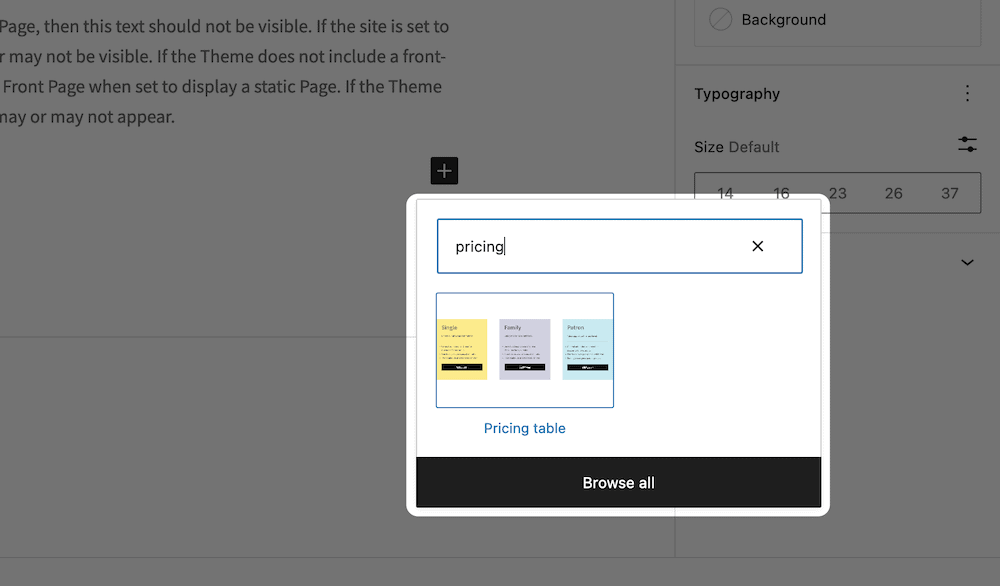
After making some changes to the content, you will have three subscription tiers.
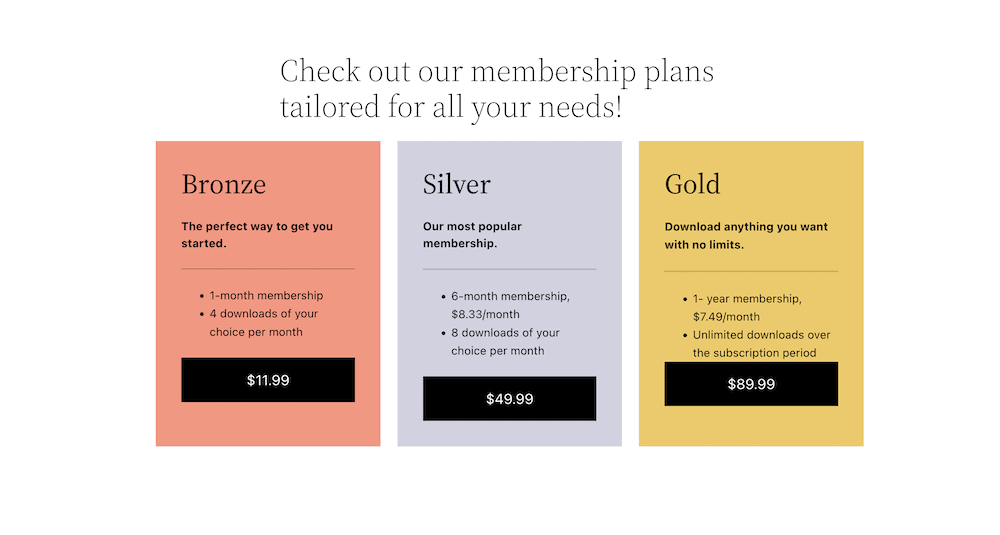
By default, the pricing table links don’t lead anywhere. We need to add a link to the Register page created by Restrict Content Pro.
To do this, get the front-end URL for the Register page, return to the pricing table and add it to the button for each subscription tier.

Save the changes. Now, view them live on your website. Double-check that the URLs are correct by clicking the link for each tier. Each link should link to the Register page.
🎉 Congratulations! You’re ready to start restricting access and limiting the number of downloads according to the membership level.
4. Set Up Your Download Rules
With the Advanced Access Manager extension for Download Monitor, you can apply different rules to your files.
This extension is the glue between Restrict Content PRO and Download Monitor, allowing you to add download limits for your previously created membership levels.
After installing and activating Advanced Access Manager, go to WordPress’s backend and locate the menu entry titled Downloads > Global Rules.
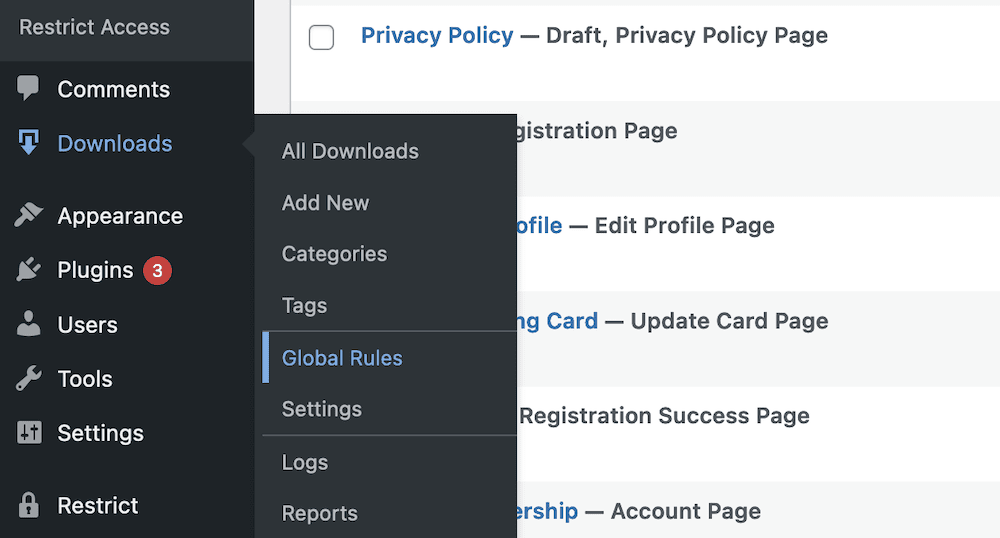
The Download Monitor and Restrict Content Integration plugin allows you to group by Membership Levels provided by Restrict Content Pro plugin.
Choose a group from the drop-down menu and select the membership tiers and the desired restrictions—global restriction rules to your Download Monitor files.

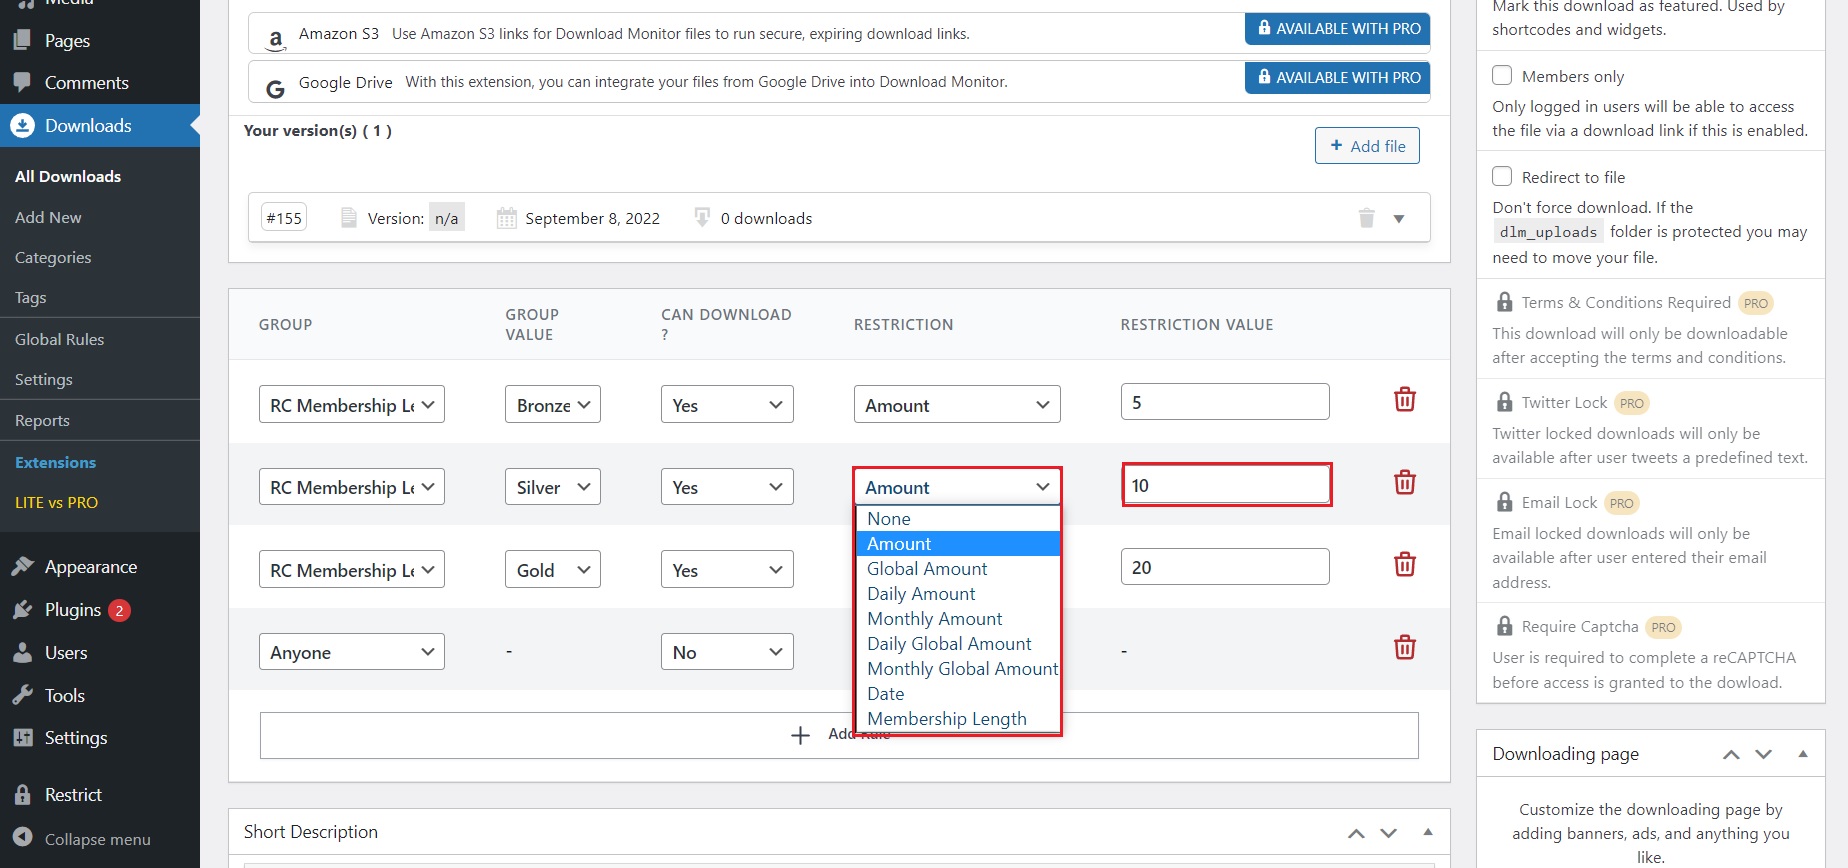
To set up a download amount limit with Download Monitor is very easy. Go to the edit mode of your download file and scroll down to the rules section and click on Add rule button.
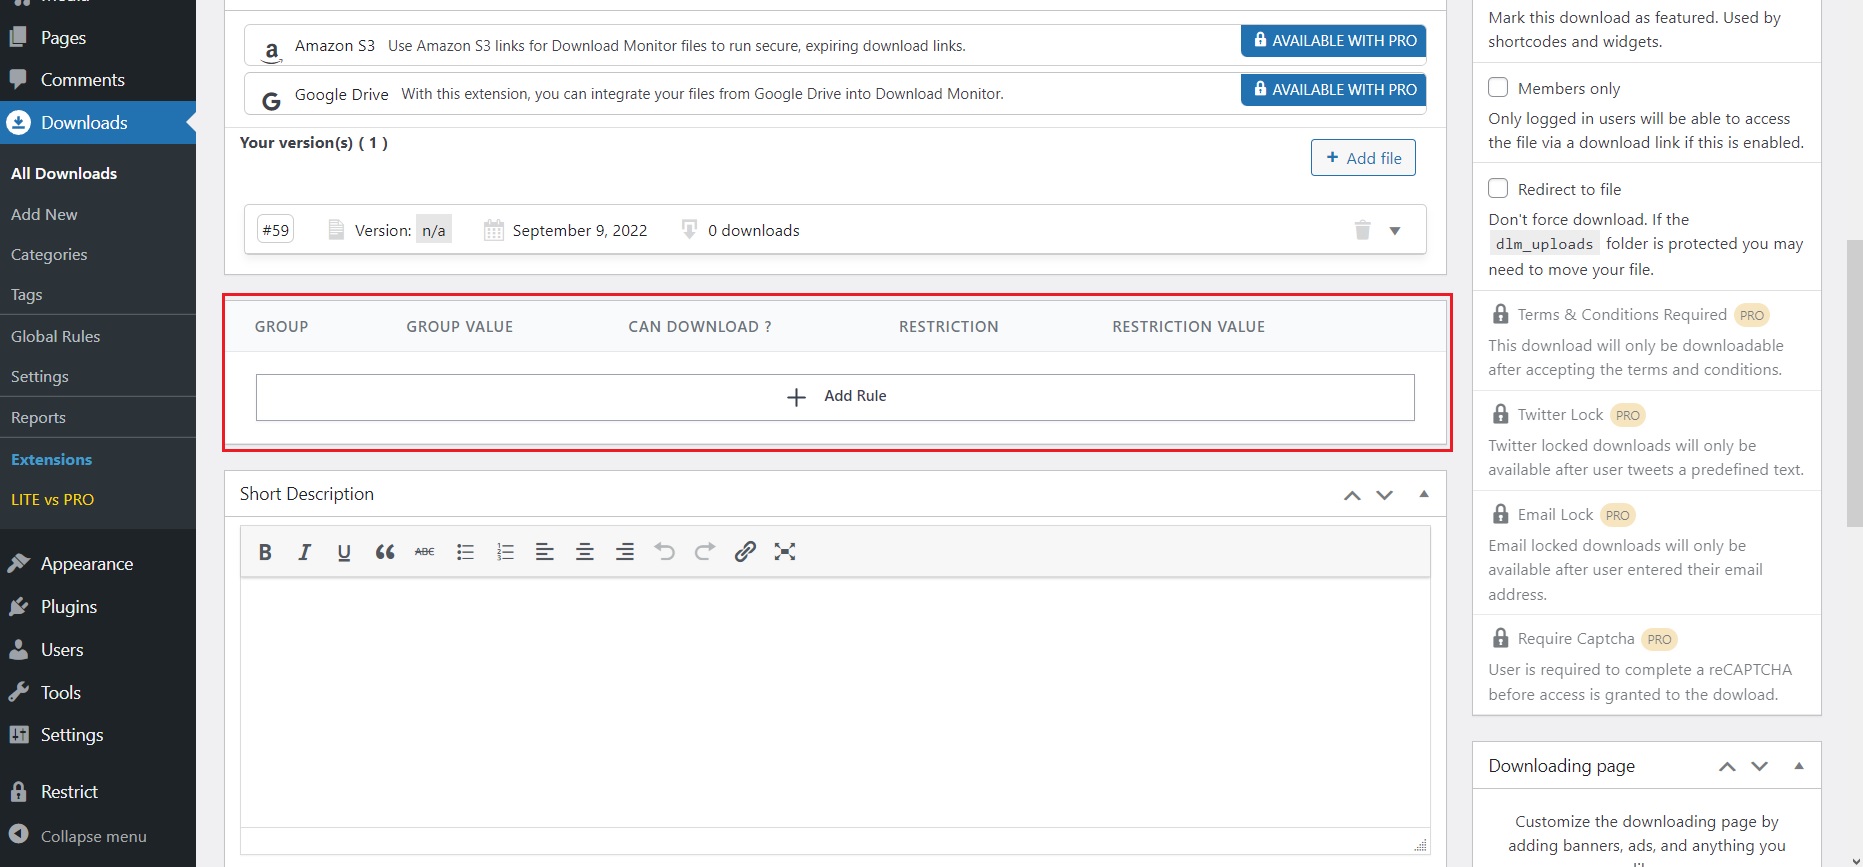
Select the appropriate Group, Group value, and “Can download” value. Afterward, in the drop-down menu under Restriction, select Amount. There you can specify how many downloads you want to allocate to that specific membership tier. You can also specify daily or monthly amount.
For more information on the download limitations you set in place, check out out documentation on the Advanced Access Manager extension.
The last step is to notify users without access. In the next section, we’ll also teach you how to do this.
5. Create and Set a ‘No Access’ Page
This step is relatively simple, as Download Monitor does most of the work. However, you will need to create a separate page to display when a user attempts to access restricted content.
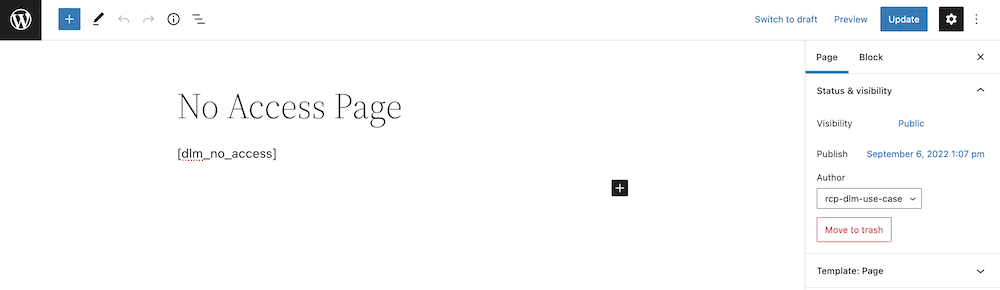
The process is precisely the same as creating a new page in WordPress. Go to the Pages > Add New screen, give the page a title and then add the shortcode [dlm_no_access].
This shortcode will tell Download Monitor that this page is your “No access” page.
The last step is to tell Download Monitor the page we’ve chosen as our no-access page. To do this, go to Downloads > Settings > Advanced in the site’s backend.
Then, find the No Access Page from the drop-down and select the page you just created.
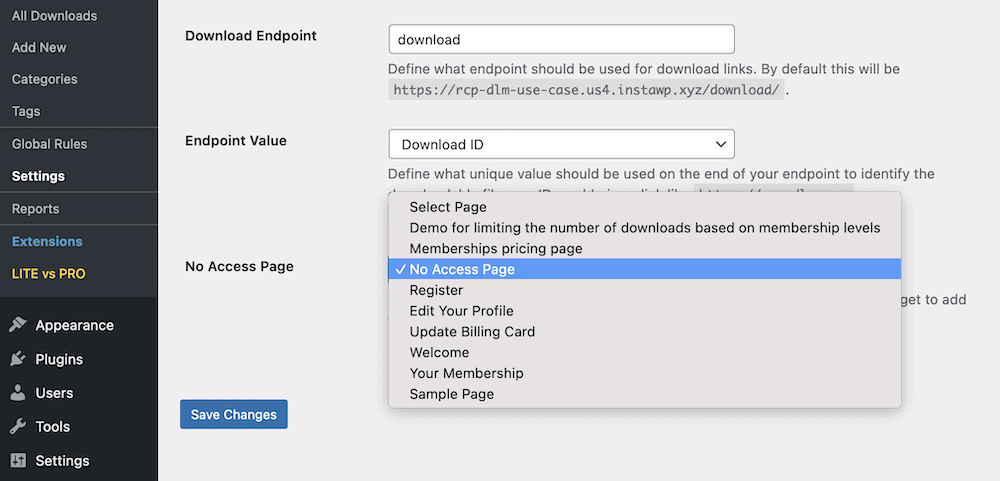
After you save the changes, you’ll be able to limit downloads based on the membership level using Download Monitor and Restrict Content Pro!
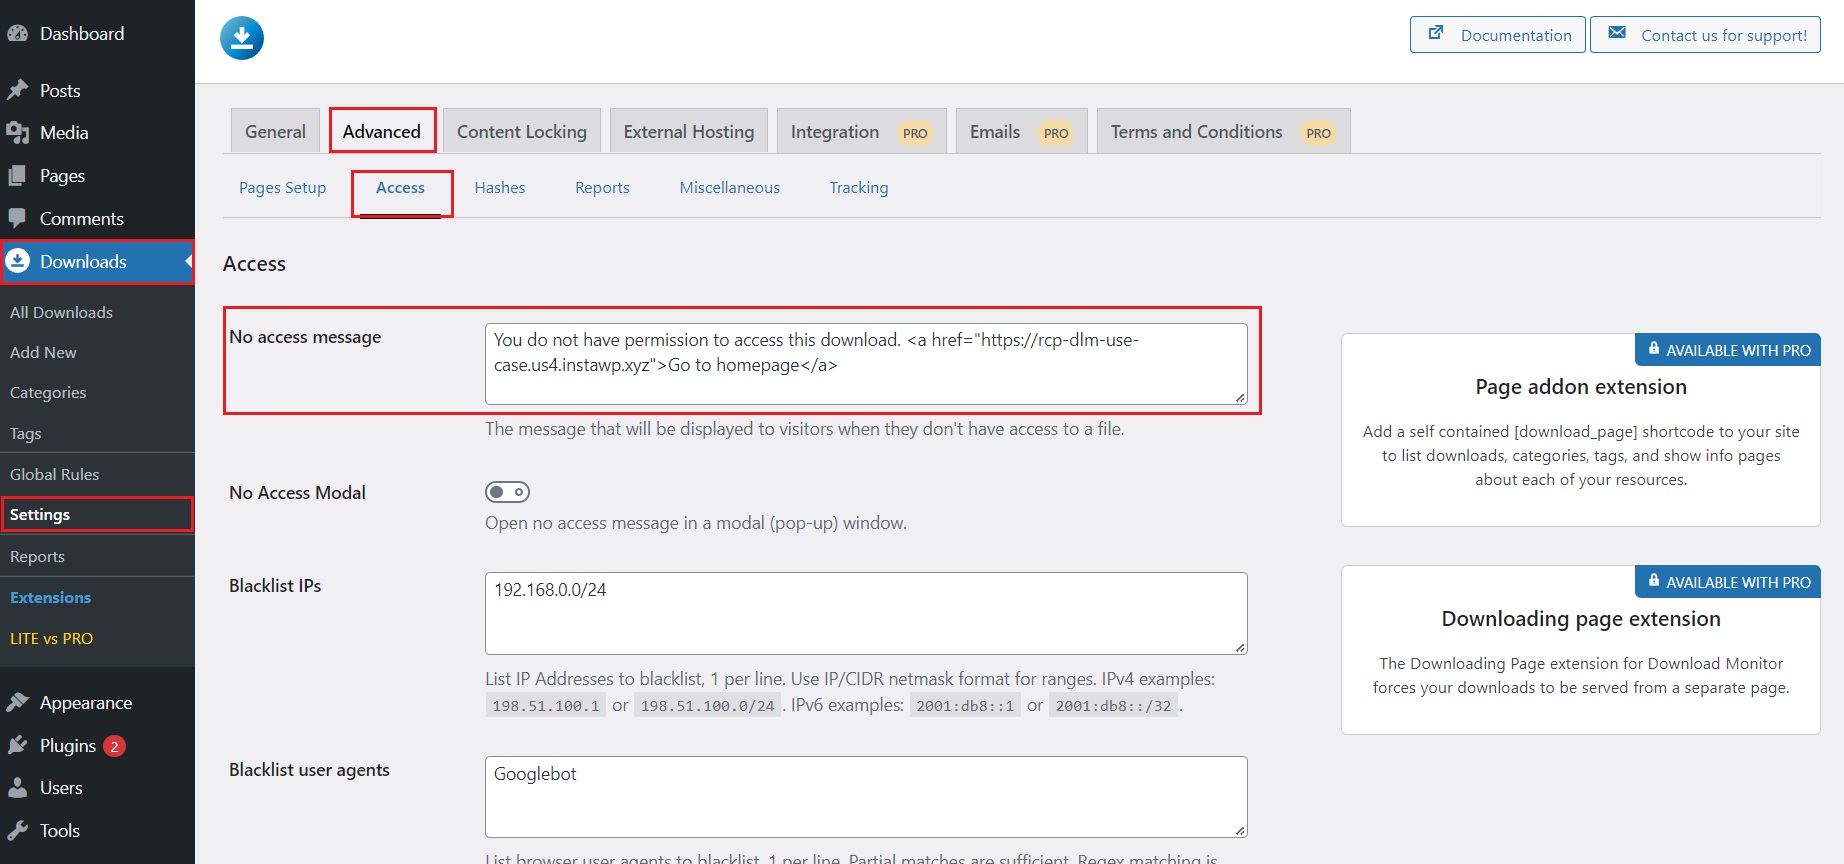
Remember that you’re going to want to go to Downloads -> Settings -> Advanced -> Access and set a custom “No access message” to showcase in case people are not authorized to download the content.
Conclusion
Using Download Monitor and Restrict Content Pro together will boost your download business. Limiting the number of downloads based on membership levels creates an excellent potential for increased revenue.
It’s down to you what packages/tiers to offer and at what pricing. There are multiple growth opportunities. In sales, and of course, in attracting new users.
Creating packages with download limits allows you to upsell. Resetting the download limits by a date period will attract new users and prevents account sharing.
Why not mix things up? Entice users with a free plan with limited access to downloads, and if your content is as good as we know it will be, there’s every chance they’ll become paying customers!
This tutorial has shown you How to Limit the Number of Downloads Based on Membership Levels in WordPress using Download Monitor and Restrict Content Pro.
If you’re ready to start, you should know that Download Monitor and Restrict Content PRO have a 14-day money-back guarantee. Try them together, and see how they can benefit your online downloads business!
Download Monitor
Grow your audience, track download performance, and convert your traffic into email subscribers with an easy-to-use digital downloads solution for WordPress.